bunq API
UPDATE: We have released a
NOTICE: We have updated the sandbox base url to https://public-api.sandbox.bunq.com/v1/. Please update your applications accordingly. Check here: for more info.
PSD2 NOTICE: The second Payment Services Directive (PSD2) may affect your current or planned usage of our public API, as some of the API services are now subject to a permit. Please be aware that using our public API without the required PSD2 permit is at your own risk and take notice of our updated API Terms and Conditions on for more information.
Introduction
Welcome to bunq!
- The bunq API is organised around REST. JSON will be returned in almost all responses from the API, including errors but excluding binary (image) files.
- Please configure your implementation to send its API requests to
https://public-api.sandbox.bunq.com/v1/ - There is a version of the that connects to the bunq Sandbox environment. To create accounts for the Sandbox app, please follow the steps in the section.
Getting started
Before you start sending API requests, you need to get an API key and activate it. API activation happens when you install the API key and link your IP address and device to it (create an API context). The steps below will guide you through what you need to do to start sending custom API requests.
Here is an overview of what you can use to get started with the bunq API:
- Create an API key. You can do it either in our or in the bunq app (Profile → Security & Settings → Developers → API keys). If you want to test our sandbox first, our is the best place to start.
- Register a device. A device can be a phone (private), computer or a server (public). You can register a new device by using the
POST /installationandPOST /device-servercalls. This will activate your API key. You only need to do this once. - Open a session. Sessions are temporary and expire after the auto-logout time set for the user account. It can be changed by the account owner in the bunq app.
- Make your first call!
Versioning
Developments in the financial sector, changing regulatory regimes and new feature requests require us to be flexible. This means we can iterate quickly to improve the API and related tooling. Therefore, we have chosen not to attach any version numbers to the changes just yet.
We will inform you in a timely manner of any important changes we make before they are deployed on together.bunq.com. You can also to make sure you don't miss any important updates.
OAuth
What is OAuth?
is a protocol that will let your app connect to bunq users in a safe and easy way. Please be aware that if you will gain access to the account information of other bunq users or initiate a payment for them, .
Get started with OAuth for bunq
To initiate authorization into the bunq user accounts, you need to create an OAuth Client and register at least 1 redirect URL for it.
You can have 1 OAuth Client at a time. Reuse your OAuth credentials for every authorization request.
The list of steps below will help you to get started:
- Register an OAuth Client by creating an app in .
- Add one or more Redirect URLs.
- Get your
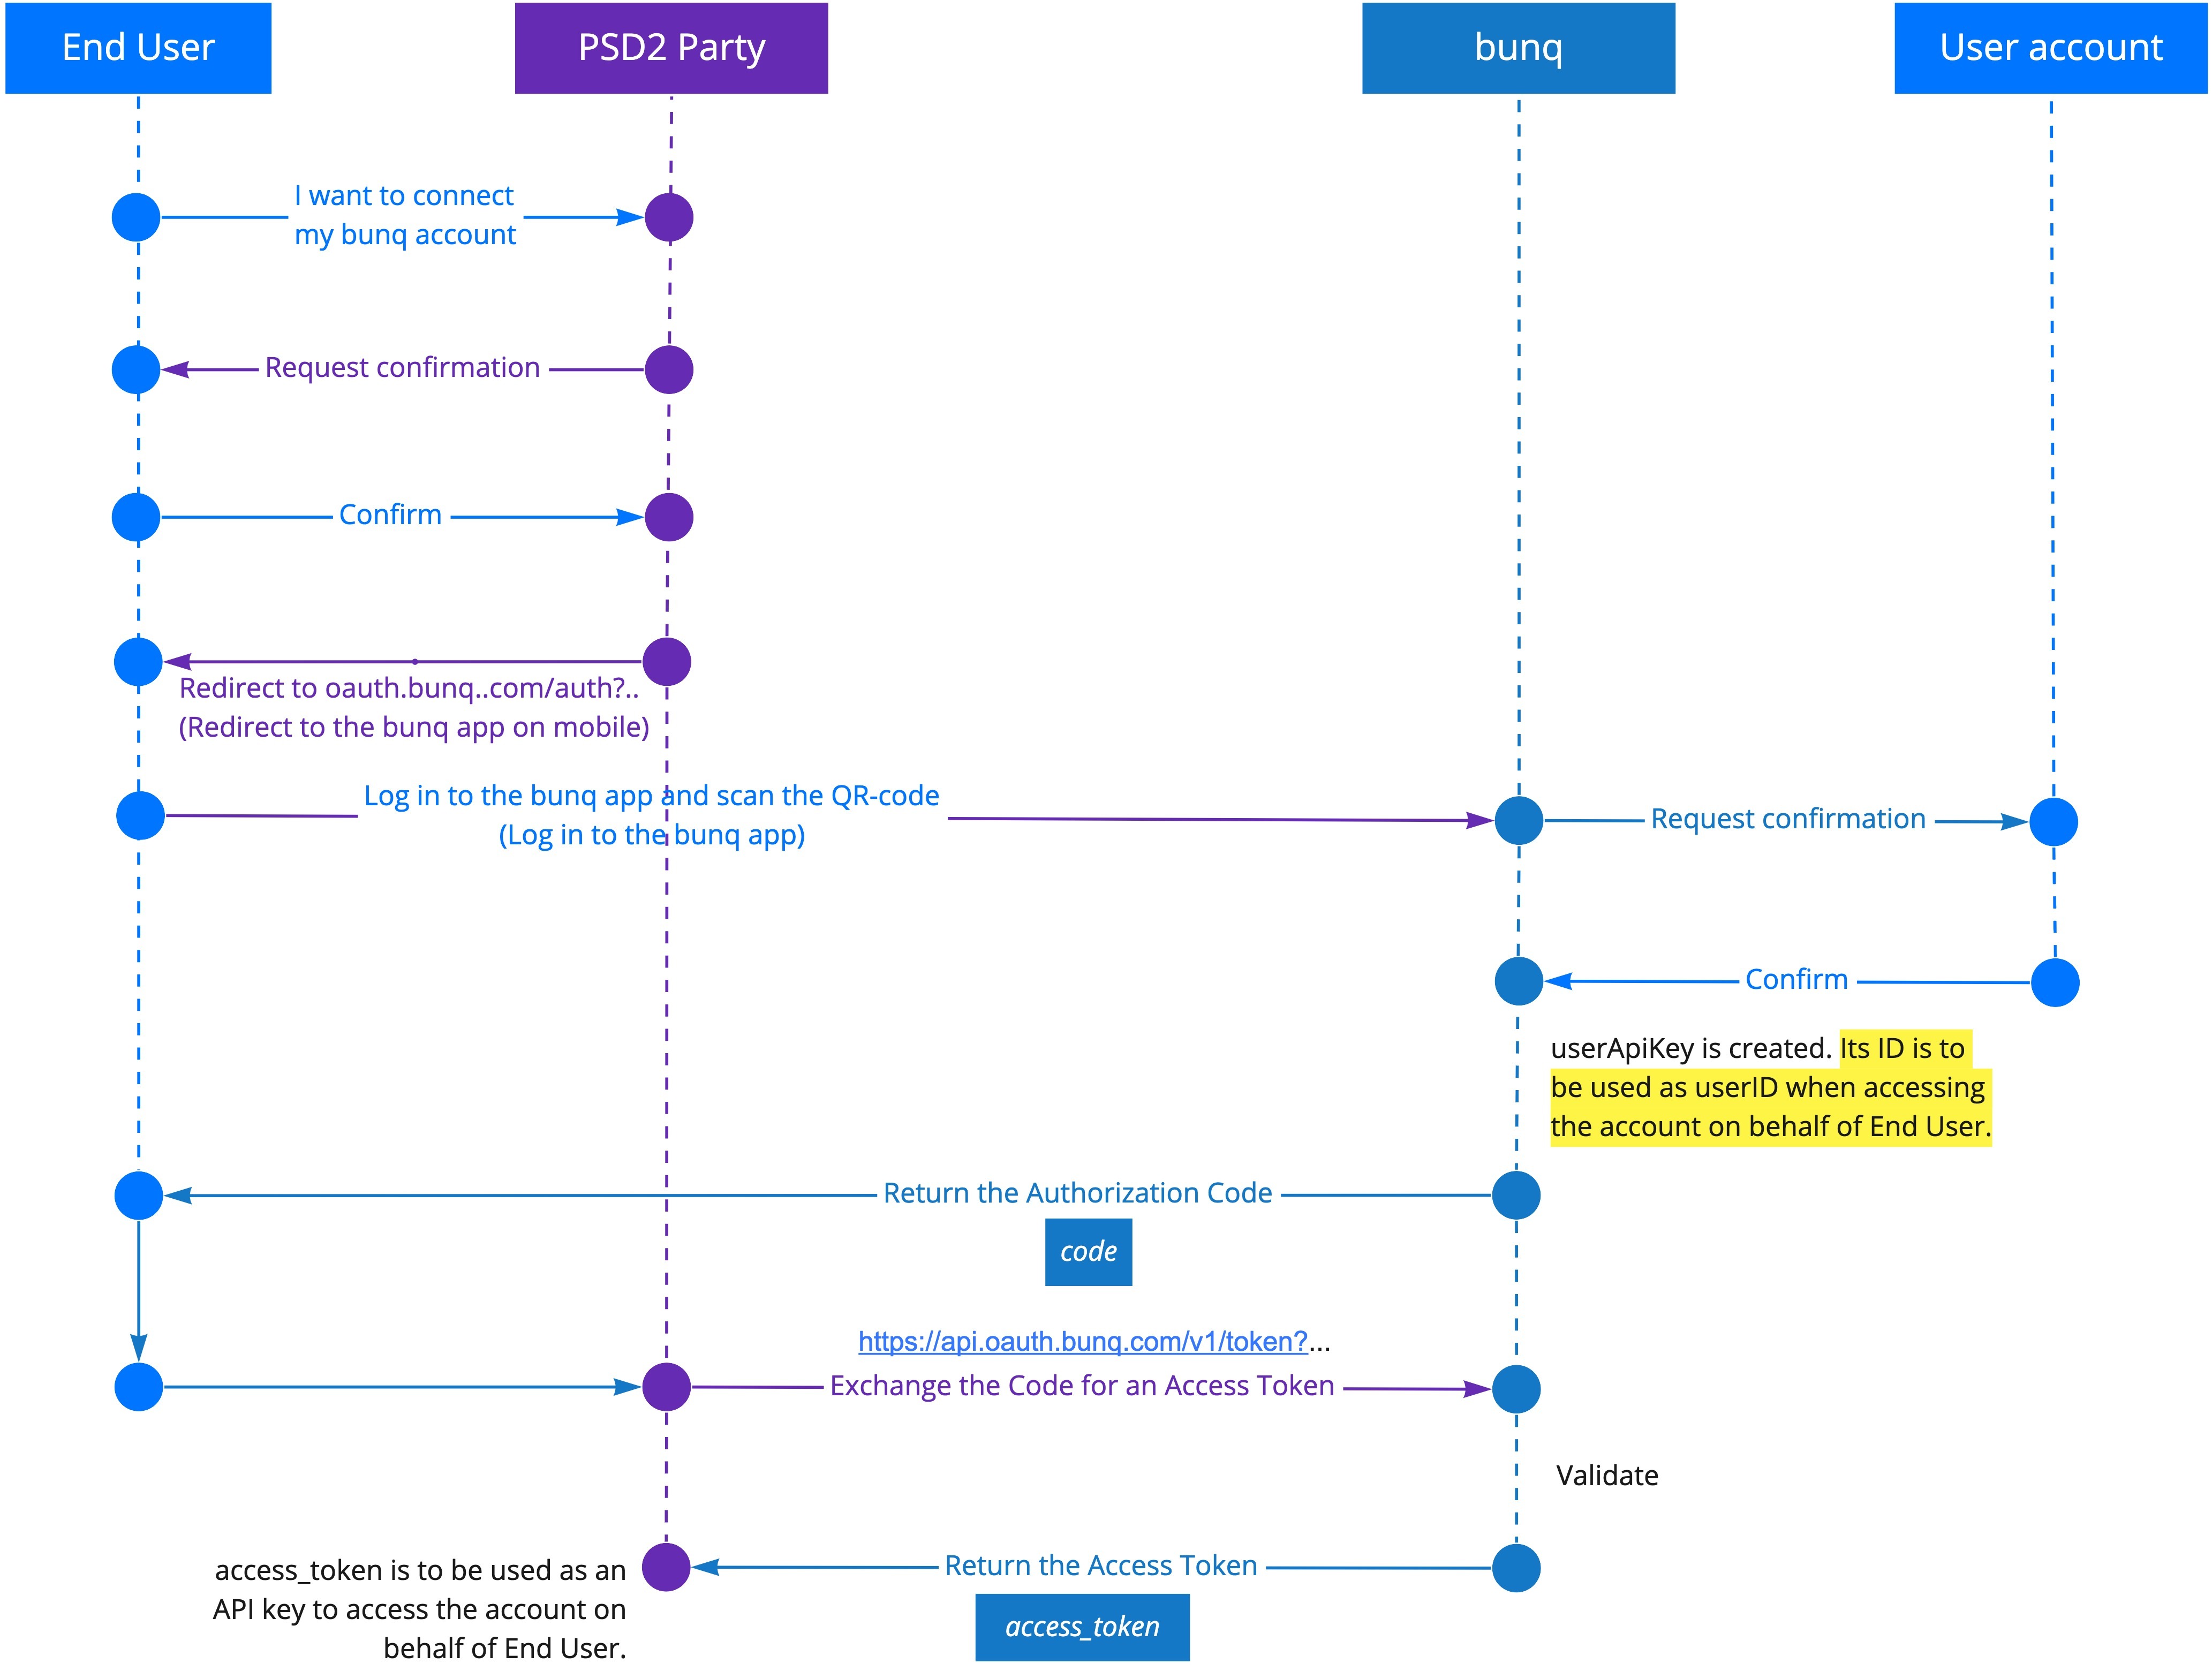
client_idandsecretfrom your app information tab in . - Redirect your users to the .
- If the user accepts the authorization request, they will be redirected to the previously specified
redirect_uriwith an authorizationcodeparameter. - Use the to exchange the authorization
codefor anaccess_token. - Use the
access_tokenas a normal API Key. Open a session or use to get started.
You can set up an OAuth Client and add redirect URLs to it using the dedicated endpoints too. Follow the flow below to do it programmatically.
ℹ️ As a PSD2 user, you cannot log in to the bunq app. You need to follow the flow below to register an OAuth Client for your application.

What can my apps do with OAuth?
We decided to launch OAuth with a default permission that allows you to perform the following actions:
- read and create Monetary Accounts;
- read Payments & Transactions;
- create Payments between Monetary Accounts of the same user;
- create Draft-Payments (the user will need to approve the payment using the bunq app);
- assign a Monetary account to a Card;
- read, create and manage Cards;
- read and create Request-Inquiries
- read Request-Responses.
As a PSD2-licensed developer, you are limited to the permission scopes of your role.
Your web or mobile app should redirect users to the following URL:
https://oauth.bunq.com/auth
The following parameters should be passed:
response_type- bunq supports the authorization code grant, providecodeas parameter (required)client_id- your Client ID, get it from the bunq app (required)redirect_uri- the URL you wish the user to be redirected after the authorization, make sure you register the Redirect URL in the bunq app (required)state- a unique string to be passed back upon completion (optional)
Use https://oauth.sandbox.bunq.com/auth in the sandbox environment.
Authorization request example:
Authorization request response:
Token exchange
If the authorization request is accepted by the user, you get the authorization code. Exchange it for an access_token.
Make a POST call to https://api.oauth.bunq.com/v1/token . Pass the following parameters as GET variables:
grant_type- the grant type used,authorization_codefor now (required)code- the authorization code received from bunq (required)redirect_uri- the same Redirect URL used in the authorisation request (required)client_id- your Client ID (required)client_secret- your Client Secret (required)
Use https://api-oauth.sandbox.bunq.com/v1/token in the sandbox environment.
Token request example:
Note: The request should only contain URL parameters. No body is expected.
Example successful response:
Example error response:
What's next?
To start sending calls to the account of the user who has accepted your authorization request, create an API context for the access_token you have received as the result of the token exchange. The access_token can be used as a normal API key. Please continue with .
NOTE: When connecting to a bunq user's account using OAuth, you create a new user (userApiKey) that has its own id and access_token . When sending a request on behalf of a user connected to your app via OAuth, use the id of userApiKey as userId and the item ids of the bunq user (grantedByUser).
Example of a successful request URL:
When calling GET /user/{userID}, you might expect to get UserPerson or UserCompany. Instead, you will get the UserApiKey object, which contains references to both the user that requested access (you) and the user that granted access (the bunq user account that you connected to).
.jpg?alt=media&token=d1f212a2-3105-4f0e-a980-34b04a12998a)
All good? Ready to connect to your bunq users? Refer to our style guide and use the following assets when implementing the Connect to bunq button.
Visit us on together.bunq.com, share your creations, ask question and build your very own bunq app!
Authentication
- All requests must use HTTPS. HTTP calls will fail.
- You should use SSL Certificate Pinning and Hostname Verification to ensure your connection with bunq is secure.
- The auto logout time that you set in the app applies to all your sessions including the API ones. If a request is made 30 minutes before a session expires, the session will automatically be extended.
- We use extra signing on top of HTTPS encryption that you must implement yourself if you are not using the SDKs.
ℹ️ We use asymmetric cryptography for signing requests and encryption.
- The client (you) and the server (bunq) must have a pair of keys: a private key and a public key. You need to pre-generate your own pair of 2048-bit RSA keys in the PEM format aligned with the PKCS #8 standard.
- The parties (you and bunq) exchange their public keys in the first step of the API context creation flow. All the following requests must be signed by both your application and the server. Pass your signature in the
X-Bunq-Client-Signatureheader, and the server will return its signature in theX-Bunq-Server-Signatureheader.
Device registration
Before you can start calling the bunq API, you must activate your API key, which covers the following steps:
- register your API key, device, and IP address(es) (only once to activate your API key);
- create a session via
POST /session-server.
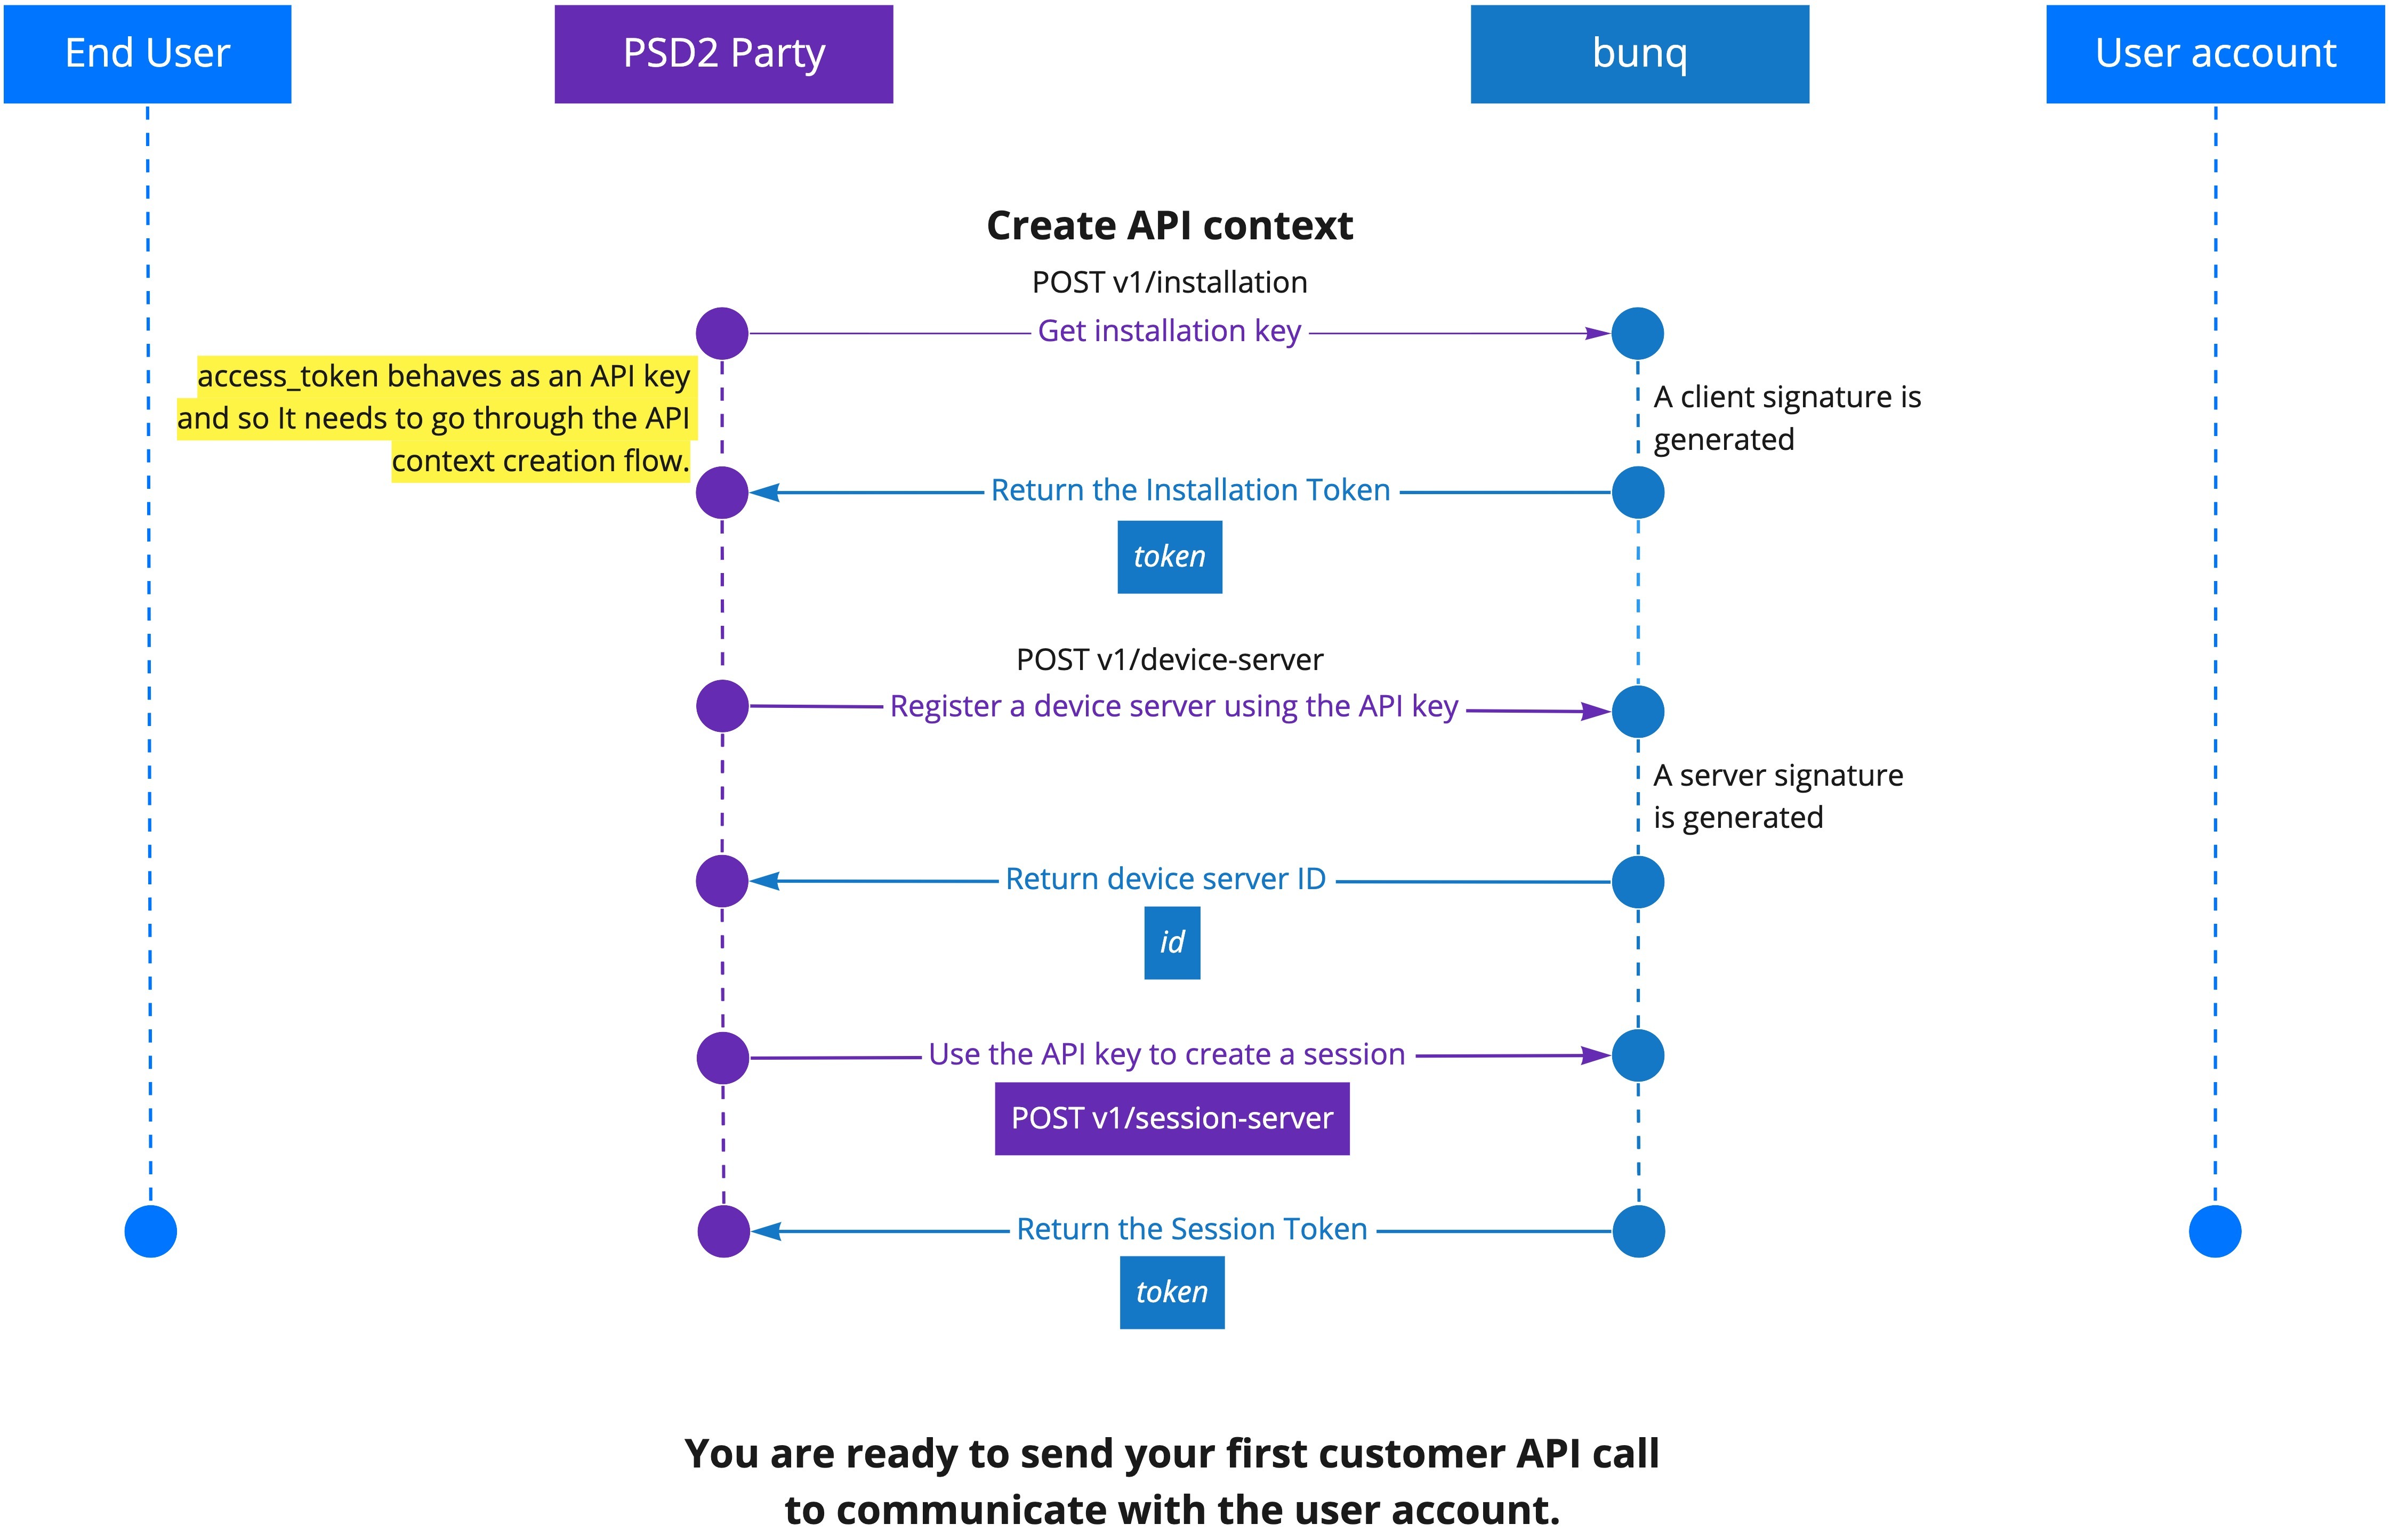
We call this sequence of steps "creating an API context."
If you are using OAuth to access a user account, you need to create an API context for the access_token you receive upon too.
Using our SDKs
- Go to our page.
- Choose the SDK in your language of choice.
- Find and use the part dedicated to creating an API context.
to see a sample project using bunq SDKs in action.
Using our API directly
- Create an Installation by calling
POST v1/installationand passing your pre-generated public key. You will receive an installation Token. Use it when making the two following API calls. - Create a DeviceServer via
POST v1/device-server. Provide a description and a secret (API key in this case). - Create a SessionServer by executing
POST v1/session-server. You will receive an authentication Token. Use it in the API requests in this active session.
to see our pre-setup API context creation calls. It will automatically generate and pre-fill everything in the API calls that create context so you can inspect the process.
IP addresses
When using a standard API Key the DeviceServer and Installation that are created in this process are bound to the IP address they are created from. Afterwards it is only possible to add IP addresses via the Permitted IP endpoint.
Using a Wildcard API Key gives you the freedom to make API calls from any IP address after the POST device-server. You can switch to a Wildcard API Key by tapping on “Allow All IP Addresses” in your API Key menu inside the bunq app. You can also programatically switch to a Wildcard API Key by passing your current ip and a * (asterisk) in the permitted_ips field of the device-server POST call. E.g: ["1.2.3.4", "*"].
Connect as a PSD2 service provider
As a service provider, either an Account Information Service Provider (AISP), Payment Initiation Service Provider (PISP), or Card Based Payment Instrument Issuer (CBPII), you have obtained or are planning to obtain a license from your local supervisor. You will need your unique eIDAS certificate number to start using the PSD2-compliant bunq API on production.
We accept pseudo certificates in the sandbox environment so you could test the flow. You can generate a test certificate using the command below.
⚠️ Make sure to include AISP and/or PISP in the name to generate a certificate with the roles.
Register as a service provider
Before you can read the information on bunq users or initiate payments, you need to register a PSD2 account and receive credentials that will enable you to access the bunq user accounts.
- Execute
POST v1/installationand get your installation Token with a unique random key pair. - Use the installation Token and your unique PSD2 certificate to call
POST v1/payment-service-provider-credential. This will register your software. - Receive your API key in return. It will identify you as a PSD2 bunq API user. You will use it to start an OAuth flow. The session will last 90 days. After it closes, start a new session using the same API key.
- Register a device by using
POST v1/device-serverusing the API key for the secret and passing the installation Token in theX-Bunq-Client-Authenticationheader. - Create your first session by executing
POST v1/session-server. Provide the installation Token in theX-Bunq-Client-Authenticationheader. You will receive a session Token. Use it in any following request in theX-Bunq-Client-Authenticationheader.
NOTE. The first session will last 1 hour. Start a new session within 60 minutes.

Register your OAuth application
Before you can start authenticating on behalf of a bunq user, you need to get Client ID and Client Secret, which will identify you in authorization requests to the user accounts.
- Call
POST /v1/user/{userID}/oauth-clientto create an OAuth Client. - Add a redirect URL to the OAuth Client via
POST /user/{userID}/oauth-client/{oauth-clientID}/callback-url. - Call
GET /v1/user/{userID}/oauth-client/{oauth-clientID}. We will return your Client ID and Client Secret. - You are ready to .
The flow below will guide you through the full OAuth connection process. Note that you only need to create OAuth credentials once.

Access user accounts as an AISP
As an AISP, you are allowed to authenticate in a user’s account and access (read) the following account information:
- legal name
- IBAN
- nationality
- card validity data
- transaction history
- account balance
To read the user's information, you need to establish a connection with their bunq account. You can do it using an . Once a bunq user has confirmed the authorization request and you have done the , you can activate the Access Token (use it as an API key).
Token activation happens when you create an API context (install it and link your IP adrress and device to it). See the page for the full flow illustration.
An active Access Token allows you to communicate with the bunq user’s account. You can use it to start a session to interact with the monetary accounts the user allows you to access.

Make payments as a PISP
As a PISP, you are allowed to authenticate in a user’s account with the following permissions:
read account information (viaGET /user):
- legal name;
- IBAN;
- initiate payments (create draft payments via either
POST /user/{userID}/monetary-account/{monetary-accountID}/draft-paymentorPOST /user/{userID}/payment-service-provider-draft-payment) and read their statuses; - confirm that the account balance is sufficient for covering the payment (via
POST /user/{userID}/confirmation-of-funds).
The bunq API provides endpoints for different scenarios of the implementation of the payment initiation functionality. In particular, as a PISP user, you can build applications that initiate and authorize one-off or multiple incoming payments. Depending on the use case you are intending to deploy, you might need to initiate the OAuth authorization either before or after the payment initiation.
Authorization of multiple (scheduled) payments
It is possible to initiate payments from a bunq user's account having previously established an OAuth connection between your application and the bunq user's account. The bunq user will receive push notifications for each initiated payment.
Once a bunq user has , you can initiate the payment confirmation flow.
- Create a draft payment via
POST /user/{userID}/monetary-account/{monetary-accountID}/draft-paymentpassing the following parameters:monetary-accountId and userId(userApiKey'sid; see for more information) in the endpoint URL;- the customer’s email address, phone number, or IBAN in the
counterparty_aliasfield of the request body.
- If the user confirms their intent to make the payment, bunq carries out the transaction.
- Check the status of the payment via
GET /user/{userID}/monetary-account/{monetary-accountID}/draft-paymentusing the draft paymentidparameter returned in the previous step.
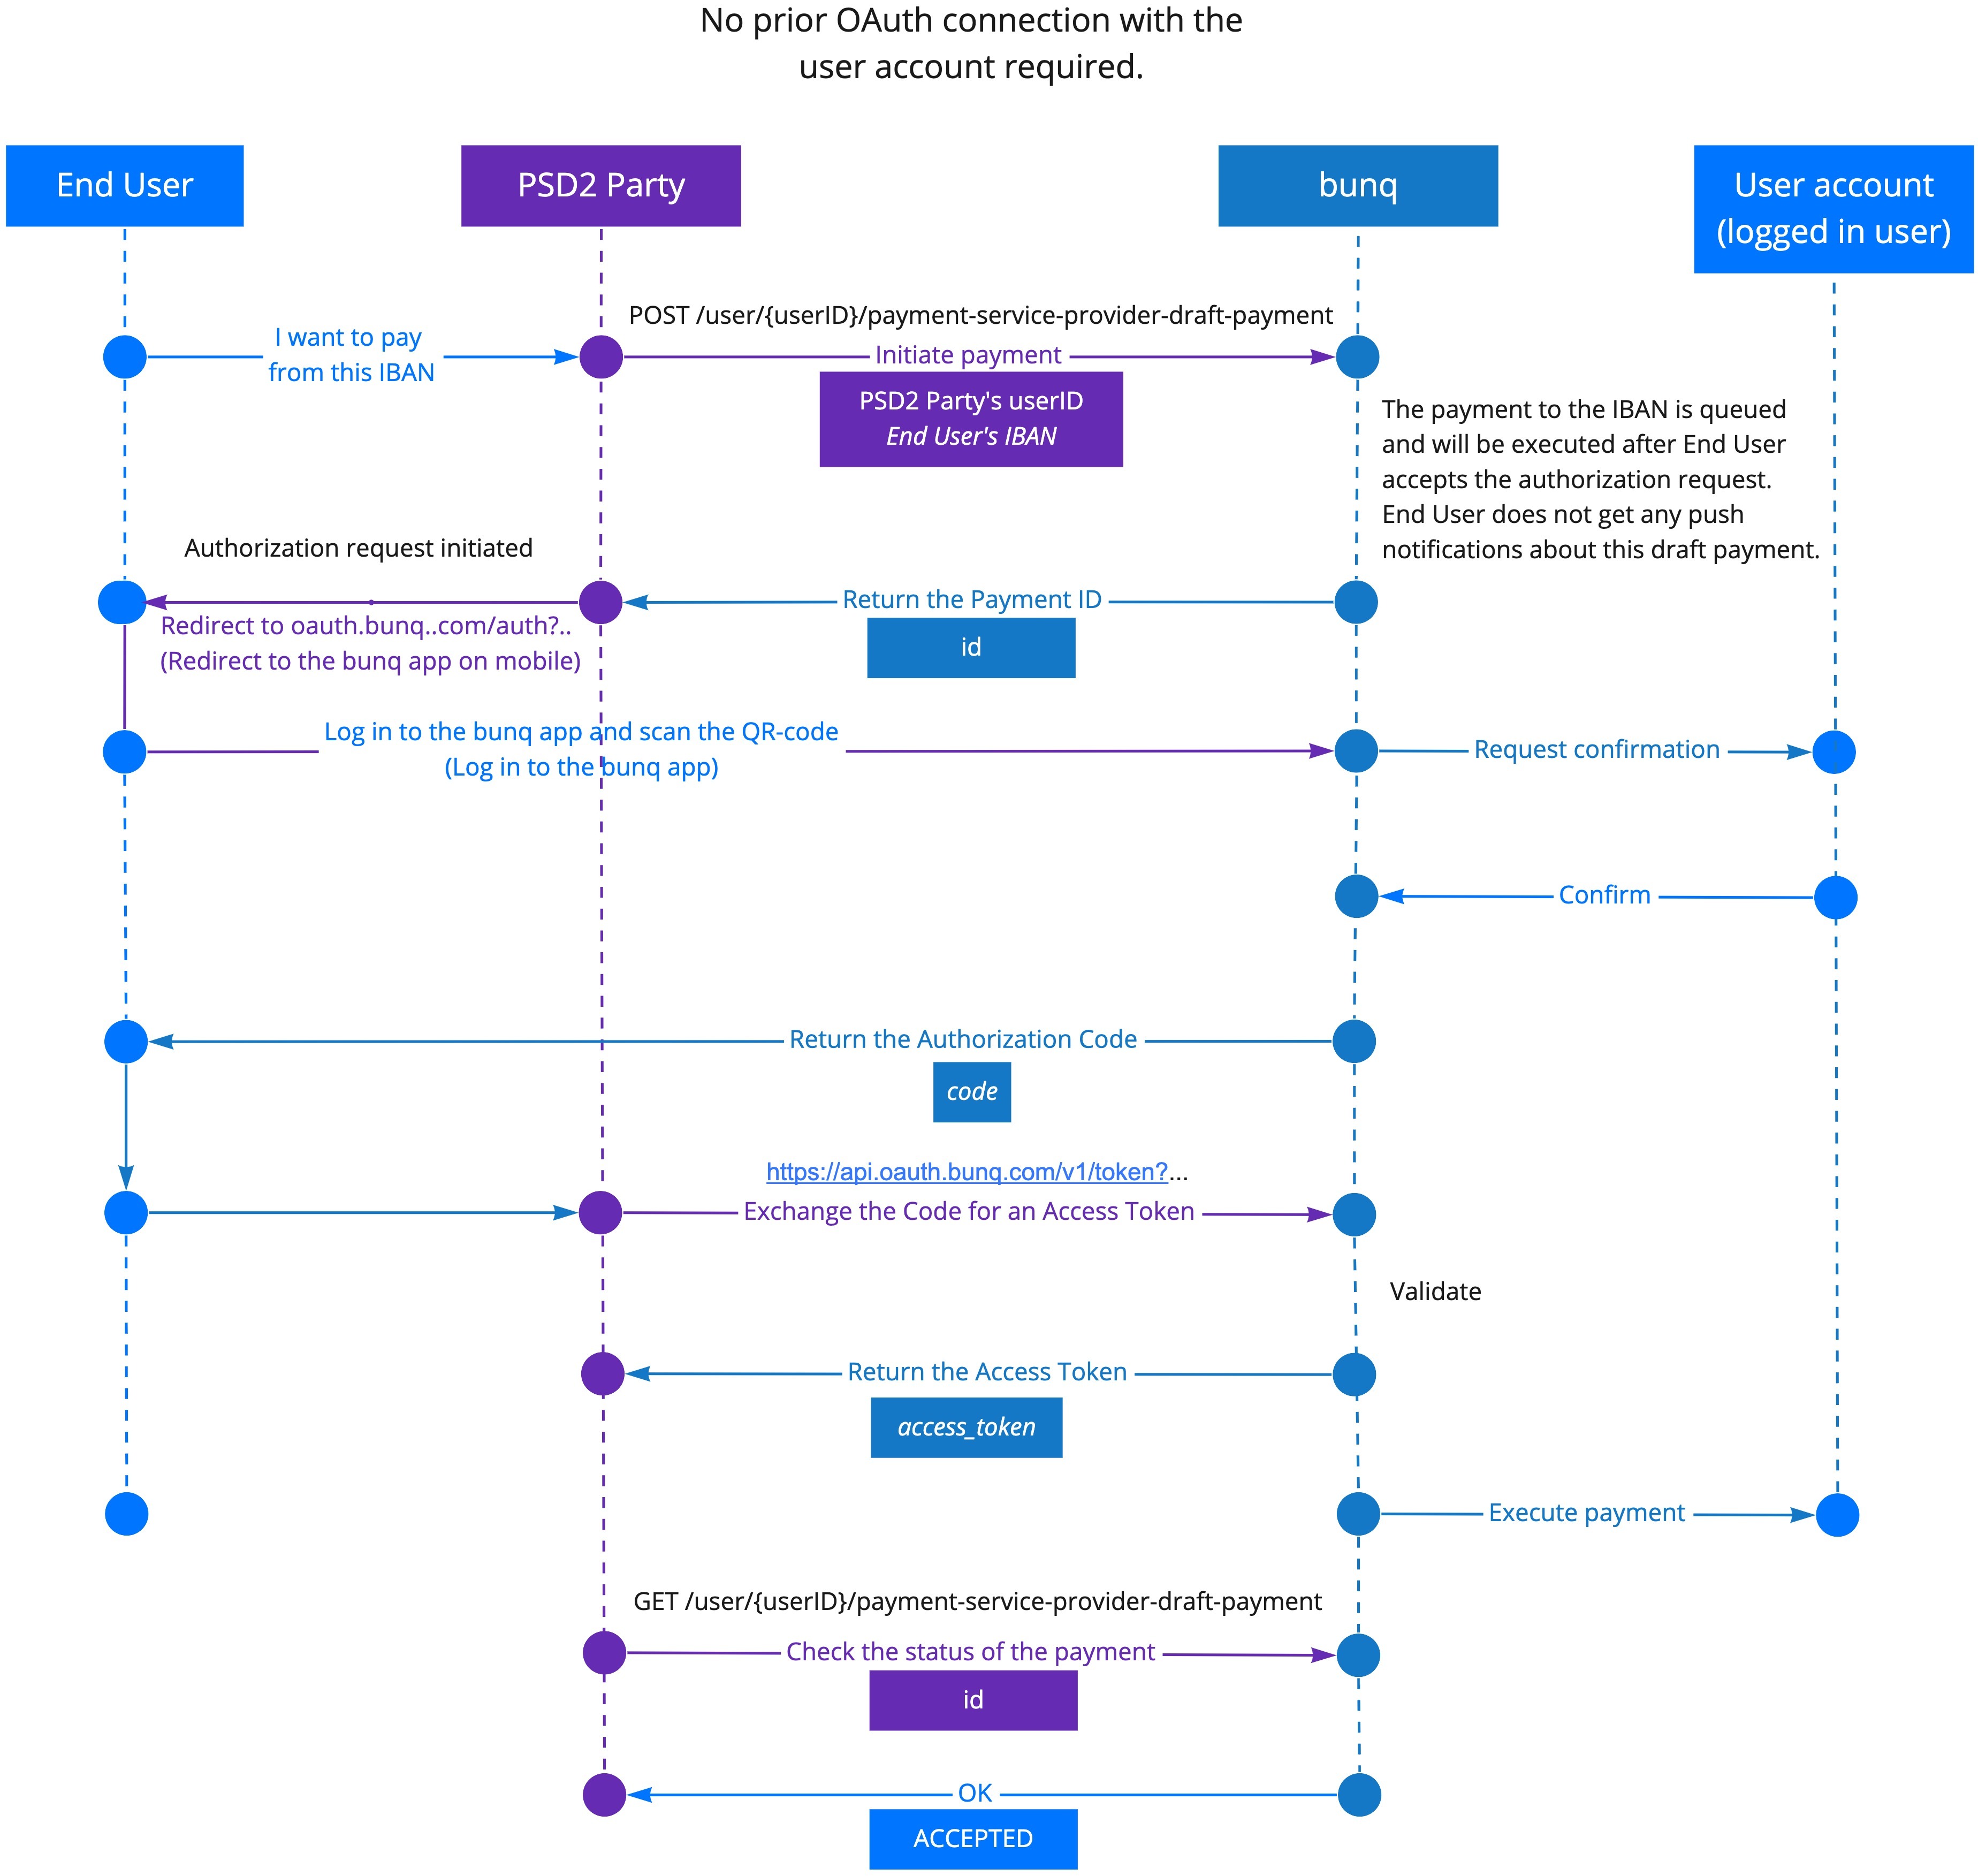
Single payment authorization
It is possible to initiate payments having only the IBAN of the payer using POST /user/{userID}/payment-service-provider-draft-payment. In this case, the bunq user will accept the payment along with the authorization request. No additional push notifications are sent to the user.
- Collect the bunq user's IBAN (and name) in the UI of your application.
- Create a draft payment via
POST /user/{userID}/payment-service-provider-draft-payment. - Initiate an Upon the QR-code scan, the bunq user will see and be able to either accept or reject the payment authorization request.
- Check the status of the payment.

Confirm available funds as a CBPII
As a CBPII, you are allowed to authenticate in a user’s account to validate the availability of funds for the payment in question.
- Collect an alias for the bunq user's account (their name and IBAN, email address, or phone number).
- Check the availability of funds via
POST /user/{userID}/confirmation-of-fundspassing the following information:- your
userId; - the amount of money needed for the payment;
- the name of the bunq user and the IBAN of the account (email address or phone number pointing at the user are also possible).
- your
Signing
⚠️ NOTE: We deprecated the signing of the entire API request (the URL, headers and body). You only need to sign the request body. Requests with full request signatures are no longer validated.
We are legally required to protect our users and their data from malicious attacks and intrusions. That is why we beyond having a secure https connection, we use for signing requests that create a session or payment. The use of signatures ensures the data is coming from the trusted party and was not modified after sending and before receiving.
Request body signing is only mandatory for the following operations:
- open a session;
- create a payment;
- create a scheduled payment;
- any other operation that executes a payment such as the following:
- accept a draft payment;
- accept a scheduled payment;
- accept a draft scheduled payment;
- accept a payment request.
You will know that the API call must be encrypted if you get the 466 error code.
The signing mechanism is implemented in our so if you are using them you don't have to worry about the details described below.
The signatures are created using the SHA256 cryptographic hash function and included (encoded in base 64) in the X-Bunq-Client-Signature request header and X-Bunq-Server-Signature response header. The data to sign is the following:
- For requests: the body only.
- For responses: the body only.
For signing requests, the client must use the private key corresponding to the public key that was sent to the server in the installation API call. That public key is what the server will use to verify the signature when it receives the request. In that same call the server will respond with a server side public key, which the client must use to verify the server's signatures. The generated RSA key pair must have key lengths of 2048 bits and adhere to the PKCS #8 standard.
Request signing example
Consider the following request, a POST to /v1/user/126/monetary-account/222/payment (the JSON is formatted with newlines and indentations to make it more readable):
Let's sign that request. First create a variable $dataToSign containing the body of the request:
Next, create the signature of $dataToSign using the SHA256 algorithm and the private key $privateKey of the Installation's key pair. In PHP, use the following to create a signature. The signature will be passed by reference into $signature.
openssl_sign($dataToSign, $signature, $privateKey, OPENSSL_ALGO_SHA256);
Encode the resulting $signature using base64, and add the resulting value to the request under the X-Bunq-Client-Signature header. You have just signed your request, and can send it!
Response verifying example
The response to the previous request is as follows (the JSON is formatted with newlines and indentations to make it more readable):
We need to verify that this response was sent by the bunq server and not from a man-in-the-middle:
- Create a
$dataToSignvariable containing the body of the request.
NOTE: We started to only sign the response body on April 28, 2020. Please make sure you validate our new response signature.
So for our example above the response to sign will look like this:
Now, verify the signature of $dataToVerify using the SHA256 algorithm and the public key $publicKey of the server. In PHP, use the following to verify the signature.
openssl_sign($dataToVerify, $signature, $publicKey, OPENSSL_ALGO_SHA256);
Troubleshooting
If you get an error telling you "The request signature is invalid", please check the following:
- There are no redundant characters (extra spaces, trailing line breaks, etc.) in the data to sign.
- Make sure the body is appended to the data to sign exactly as you're adding it to the request.
- You have added the full body to the data to sign.
- You use the data to sign to create a SHA256 hash signature.
- You have base64 encoded the SHA256 hash signature before adding it to the request under
X-Bunq-Client-Signature.
Headers
HTTP headers allow your client and bunq to pass on additional information along with the request or response.
While this is already implemented in our , please follow these instructions to make sure you set appropriate headers for calls if using bunq API directly.
Request headers
Mandatory request headers
Cache-Control
Cache-Control: no-cache
The standard HTTP Cache-Control header is required for all requests.
User-Agent
User-Agent: bunq-TestServer/1.00 sandbox/0.17b3
The User-Agent header field should contain information about the user agent originating the request. There are no restrictions on the value of this header.
X-Bunq-Client-Signature
⚠️ UPCOMING CHANGE: Header and URL signature will stop being validated on April 28, 2020. Please only.
X-Bunq-Client-Signature: XLOwEdyjF1d+tT2w7a7Epv4Yj7w74KncvVfq9mDJVvFRlsUaMLR2q4ISgT+5mkwQsSygRRbooxBqydw7IkqpuJay9g8eOngsFyIxSgf2vXGAQatLm47tLoUFGSQsRiYoKiTKkgBwA+/3dIpbDWd+Z7LEYVbHaHRKkEY9TJ22PpDlVgLLVaf2KGRiZ+9/+0OUsiiF1Fkd9aukv0iWT6N2n1P0qxpjW0aw8mC1nBSJuuk5yKtDCyQpqNyDQSOpQ8V56LNWM4Px5l6SQMzT8r6zk5DvrMAB9DlcRdUDcp/U9cg9kACXIgfquef3s7R8uyOWfKLSNBQpdVIpzljwNKI1Q
X-Bunq-Client-Authentication
X-Bunq-Client-Authentication: 622749ac8b00c81719ad0c7d822d3552e8ff153e3447eabed1a6713993749440
The authentication token is used to authenticate the source of the API call. It is required by all API calls except for POST /v1/installation.
It is important to note that the device and session calls are using the token from the response of the installation call, while all the other calls use the token from the response of the session-server call:
- Pass the installation Token you get in the response to the
POST /installationcall in the/device-serverand/session-servercalls. - Pass the session Token you get in the response to the
POST /session-servercall in all the other calls.
Optional request headers
X-Bunq-Language
X-Bunq-Language: en_US
en_US is the default language setting for responses and error descriptions.
The X-Bunq-Language header must contain a preferred language indication. The value of this header is formatted as a ISO 639-1 language code plus a ISO 3166-1 alpha-2 country code, separated by an underscore.
Currently only the languages en_US and nl_NL are supported. Anything else will default to en_US.
X-Bunq-Region
X-Bunq-Region: en_US
en_US is the default region for localization formatting.
The X-Bunq-Region header must contain the region (country) of the client device. The value of this header is formatted as a ISO 639-1 language code plus a ISO 3166-1 alpha-2 country code, separated by an underscore.
X-Bunq-Client-Request-Id
X-Bunq-Client-Request-Id: a4f0de
This header has to specify an ID with each request that is unique for the logged in user. There are no restrictions for the format of this ID. However, the server will respond with an error when the same ID is used again on the same DeviceServer.
X-Bunq-Geolocation
X-Bunq-Geolocation: 4.89 53.2 12 100 NL
X-Bunq-Geolocation: 0 0 0 0 000 (if no geolocation is available or known)
This header has to specify the geolocation of the device. It makes it possible for bunq to map the geolocation with the payment. The format of this value is longitude latitude altitude radius country. The country is expected to be formatted of an ISO 3166-1 alpha-2 country code. When no geolocation is available or known the header must still be included but can be zero valued.
Attachment headers
Content-Type
Content-Type: image/jpeg
This header should be used when uploading an attachment to pass its MIME type. Supported types are: image/png, image/jpeg and image/gif.
X-Bunq-Attachment-Description
X-Bunq-Attachment-Description: Check out these cookies. This header should be used when uploading an Attachment's content to give it a description.
Response headers
All Responses
X-Bunq-Client-Request-Id
X-Bunq-Client-Request-Id: a4f0de
The same ID that was provided in the request's X-Bunq-Client-Request-Id header. Is included in the response (and request) signature, so can be used to ensure this is the response for the sent request.
X-Bunq-Client-Response-Id
X-Bunq-Client-Response-Id: 76cc7772-4b23-420a-9586-8721dcdde174
A unique ID for the response formatted as a UUID. Clients can use it to add extra protection against replay attacks.
X-Bunq-Server-Signature
X-Bunq-Server-Signature: XBBwfDaOZJapvcBpAIBT1UOmczKqJXLSpX9ZWHsqXwrf1p+H+eON+TktYksAbmkSkI4gQghw1AUQSJh5i2c4+CTuKdZ4YuFT0suYG4sltiKnmtwODOFtu1IBGuE5XcfGEDDSFC+zqxypMi9gmTqjl1KI3WP2gnySRD6PBJCXfDxJnXwjRkk4kpG8Ng9nyxJiFG9vcHNrtRBj9ZXNdUAjxXZZFmtdhmJGDahGn2bIBWsCEudW3rBefycL1DlpJZw6yRLoDltxeBo7MjgROBpIeElh5qAz9vxUFLqIQC7EDONBGbSBjaXS0wWrq9s2MGuOi9kJxL2LQm/Olj2g==
The server's signature for this response. See the signing page for details on how to verify this signature.
Warning header
X-Bunq-Warning
X-Bunq-Warning: "You have a negative balance. Please check the app for more details."
Used to inform you on situations that might impact your bunq account and API access.
Errors
Familiar HTTP response codes are used to indicate the success or failure of an API request.
Generally speaking, codes in the 2xx range indicate success, while codes in the 4xx range indicate an error having to do with provided information (e.g. a required parameter was missing, insufficient funds, etc.).
Finally, codes in the 5xx range indicate an error with bunq servers. If this is the case, please stop by the support chat and report it to us.
Response codes
All errors 4xx code errors will include a JSON body explaining what went wrong.
Rate limits
If you are receiving the error 429, please make sure you are sending requests at rates that are below our rate limits.
Our rate limits per IP address per endpoint:
- GET requests: 3 within any 3 consecutive seconds
- POST requests: 5 within any 3 consecutive seconds
- PUT requests: 2 within any 3 consecutive seconds
- Callbacks: 2 callback URLs per notification category
We have a lower rate limit for /session-server: 1 request within 30 consecutive seconds.
API conventions
Make sure to follow these indications when using the bunq API or get started with our SDKs.
Responses
All JSON responses have one top level object. In this object will be a Response field of which the value is always an array, even for responses that only contain one object.
Example response body
Errors
- Error responses also have one top level Error object.
- The contents of the array will be a JSON object with an error_description and error_description_translated field.
- The error_description is an English text indicating the error and the error_description_translated field can be shown to end users and is translated into the language from the X-Bunq-Language header, defaulting to en_US.
- When using bunq SDKs, error responses will be always raised in form of an exception.
Example response body
Object Type indications
When the API returns different types of objects for the same field, they will be nested in another JSON object that includes a specific field for each one of them. Within bunq SDKs a BunqResponse object will be returned as the top level object.
In this example there is a field content, which can have multiple types of objects as value such as — in this case — ChatMessageContentText. Be sure to follow this convention or use bunq SDKs instead.
Time formats
Times and dates being sent to and from the API are in UTC. The format that should be used is YYYY-MM-DD hh:mm:ss.ssssss, where the letters have the meaning as specified in ISO 8601. For example: 2017-01-13 13:19:16.215235.
Callbacks
Callbacks are used to send information about events on your bunq account to a URL of your choice, so that you can receive real-time updates.
Notification Filters
To receive notifications for certain activities on a bunq account, you have to create notification filters. It is possible to send the notifications to a provided URL and/or the user’s phone as push notifications.
Use the notification-filter-push resource to create and manage push notification filters. Provide the type of events you want to receive notifications about in the category field.
Use the notification-filter-url resource to create and manage URL notification filters. The callback URL you provide in the notification_target field must use HTTPS.
Callback categories
Mutation category
A Mutation is a change in the balance of a monetary account. So, for each payment-like object, such as a request, iDEAL-payment or a regular payment, a Mutation is created. Therefore, the MUTATION category can be used to keep track of a monetary account's balance.
Receiving callbacks
Callbacks for the sandbox environment will be made from different IP's at AWS.
Callbacks for the production environment will be made from 185.40.108.0/22.
The IP addresses might change. We will notify you in a timely fashion if such a change would take place.
Retry mechanism
When the execution of a callback fails (e.g. if the callback server is down or the response contains an error) it is tried again for a maximum of 5 times, with an interval of one minute between each try. If your server is not reachable by the callback after the 6th total try, the callback is not sent anymore.
Removing callbacks
To remove callbacks for an object, send a PUT request to the user-person, user-company, monetary-account or cash-register resource with the notification_filters field of the JSON request body unset.
Certificate pinning
We recommend you use certificate pinning as an extra security measure. With certificate pinning, we check the certificate of the server on which you want to receive callbacks against the pinned certificate that has been provided by you and cancel the callback if that check fails.
How to set up certificate pinning
Retrieve the SSL certificate of your server using the following command:
openssl s_client -servername www.example.com -connect www.example.com:443 < /dev/null | sed -n "/-----BEGIN/,/-----END/p" > www.example.com.pemPOSTthe certificate to the certificate-pinned endpoint.
Now every callback that is made will be checked against the pinned certificate that you provided. Note that if the SSL certificate on your server expires or is changed, our callbacks will fail.
Pagination
In order to control the size of the response of a LIST request, items can be paginated. A LIST request is a request for every one of a certain resources, for instance all payments of a certain monetary account GET /v1/user/1/monetary-account/1/payment). You can decide on the maximum amount of items of a response by adding a count query parameter with the number of items you want per page to the URL. For instance:
GET /v1/user/1/monetary-account/1/payment?count=25
When no count is given, the default count is set to 10. The maximum count you can set is 200.
With every listing, a Pagination object will be added to the response, containing the URLs to be used to get the next or previous set of items. The URLs in the Pagination object can be used to navigate through the listed resources. The Pagination object looks like this given a count of 25:
The newer_url value can be used to get the next page. The newer_id is always the ID of the last item in the current page. If newer_url is null, there are no more recent items before the current page.
The older_url value can be used to get the previous page. The older_id is always the ID of the first item in the current page. If older_url is null, there are no older items after the current page.
The future_url can be used to refresh and check for newer items that didn't exist when the listing was requested. The newer_id will always be the ID of the last item in the current page. future_url will be null if newer_id is not also the ID of the latest item.
Sandbox
The sandbox base URL is
We do not use real money and do not allow external transactions in the sandbox environment.
Sandbox user accounts
You need to create a sandbox user to test the bunq API. The easiest way to do it is by using :
- Log in using your bunq account or with sandbox-only access.
- Go to Sandbox Users.
- Generate up to 5 users.
- Use the sandbox API key to create an API context and/or use the user credentials to log in to the .
Alternative ways to generate sandbox API keys
There are 3 other ways you can generate a bunq sandbox API key:
- connect to (it will also return login credentials for the sandbox app);
- create it in the (you need to be logged in as a sandbox user);
- call the sandbox user endpoints directly, using , or by running a cURL command (change
sandbox-user-persontosandbox-user-companyto generate a business user):
⚠️ NOTE: An API key can only be assigned to an IP within 1 hour after its creation. After the 1 hour, it will become invalid if not assigned. API keys that are created via the sandbox app are wiped with each sandbox reset.
Once you have a sandbox API key, create more sandbox users to use as test customer accounts, and start playing with the API.
The sandbox base URL is .
Sandbox money
Without money, it's not always sunny in the sandbox world. Fortunately, getting money on the bunq sandbox is easy. All you need to do is ask Sugar Daddy for it.
Send a POST v1/request-inquiry request passing in the counterparty_alias field. Specify the type for the alias and set the allow_bunqme field. Request up to €500 at a time.
Android Emulator
In case you do not own an Android device on which you can run our Sandbox app for end-to-end testing, you can set up an emulator to run the bunq Sandbox app for Android.
Things you will need
- The that's optimised for emulating;
- .
Starting the Android Virtual Device (AVD) Manager
- Open Android Studio.
- From the top menu, select “Tools” > "Android" > "AVD Manager".
Setting up a new virtual device
- Start the wizard by clicking on "+ Create Virtual Device".
- Select a device (recommendation: "Pixel 5.0" or "Nexus 6") and press "Next".
- Select an x86 system image (recommendation: Nougat, API Level 25, Android 7.1.1 with Google APIs) and press "Next". The image needs to have Google Play Services 10.0.1 or higher.
- In the bottom left corner, select "Show Advanced Settings".
- Scroll to "Memory and Storage".
- Change "Internal Storage" to "2048 MB".
- Change "SD card" to "200 MB".
- Press "Finish".
Starting the virtual device
- On the right side under "Actions", select the green "Play" button.
- Wait for the device to boot, this may take a few minutes.
Installing the bunq Sandbox App APK
- Open the command line.
- Navigate to your Android SDK platform tools directory (e.g.
cd ~/Library/Android/sdk/platform-toolson macOS). - Make sure that the virtual device is started and has fully booted.
- Run
./adb install ~/Downloads/bunq-android-sandboxEmulator-public-api.apk, this may take a few minutes, and should finish with "Success".
Creating an account or logging in
- Create a sandbox account in the .
- Log in to the sandbox app using the sandbox user credentials.
ℹ️ You will be asked to verify your phone number when you open the app for the first time. Sandbox does not send actual SMS messages. Enter any valid phone number and use the default verification code 992266.
If you couldn't generate a sandbox account in the developer portal, use Tinker:
- Install .
- Run
tinker/user-overviewto create a sandbox account. The output of the command will include the login credentials for the sandbox account.
⚠️ NOTE: It is not possible to create accounts using the regular signup in the app, bunq is not reviewing Sandbox applications.
Moving to Production
Have you tested your bunq integration to the fullest and are you now ready to introduce it to the world? Then the time has come to move it to a production environment!
To get started you'll need some fresh API keys for the production environment, which you can create via your bunq app. You can create these under "Profile" by tapping the "Security" menu. We do, however, highly recommend using a standard API Key instead of a Wildcard API Key. The former is significantly safer and it protects you from intrusions and possible attacks.
There's only a few things to do before your beautiful bunq creation can be moved to production. You're going to have to change your API Key and redo the sequence of calls to open a session.
The bunq Public API production environment is hosted at https://api.bunq.com.
Do you have any questions or remarks about the process, or do you simply want to show off with your awesome creations? Don't hesitate to drop us a line on .
Please be aware that if you will gain access to account information of other bunq users or initiate a payment for them, you maybrequire a PSD2 permit.
Quickstart: Opening a Session
Goal
So, you want to start using the bunq API, awesome! To do this, you have to open a session in which you will be making those calls.
Getting an API key
To connect to the API, you have to make sure you have received an API key.
For production:
- create an app in the , or
- generate it in the bunq app (Profile → Security & Settings → Developers → API keys).
For sandbox You can use one of the following ways:
- create a sandbox user in the ;
- generate an API key in the (Profile → Security & Settings → Developers → API keys);
- get an API key from ;
- run a cURL request:
curl https://public-api.sandbox.bunq.com/v1/sandbox-user-person -X POST --header "Content-Type: application/json" --header "Cache-Control: none" --header "User-Agent: curl-request" --header "X-Bunq-Client-Request-Id: $(date)randomId" --header "X-Bunq-Language: nl_NL" --header "X-Bunq-Region: nl_NL" --header "X-Bunq-Geolocation: 0 0 0 0 000". Usesandbox-user-companyto generate a business user.
Note that production API key is only usable on production and sandbox key is only usable on sandbox. Sandbox key has a sandbox_ prefix while production key does not have any noticeable prefixes.
Call sequence
The calls you need to perform to set up a session from scratch are the following:
1. POST installation
Each call needs to be signed with your own private key. An Installation is used to tell the server about the public key of your key pair. The server uses this key to verify your subsequent calls.
Start by generating a 2048-bit RSA key pair. You can find examples by looking at the source code of the sdk's located at github.
Headers
On the headers page you can find out about the mandatory headers. Take care that if you are in the sandbox environment, you set an Authorization header. Specific to the POST /installation call, you shouldn't use the X-Bunq-Client-Authentication or the X-Bunq-Client-Signature headers.
Body
Post your public key to the Installation endpoint (use \n for newlines in your public key).
Response
Save the Installation token and the bunq API's public key from the response. This token is used in the Authentication header to register a DeviceServer and to start a SessionServer. The bunq API's public key should be used to verify future responses received from the bunq API.
2. POST device-server
Further calls made to the server need to come from a registered device. POST /device-server registers your current device and the IP address(es) it uses to connect to the bunq API.
Headers
Use the token you received from POST /installation in the X-Bunq-Client-Authentication header. Make sure you sign your call, passing the call signature in X-Bunq-Client-Signature header.
Body
For the secret, use the API key you received. If you want to create another API key, you can do so in the bunq sandbox app (or production app for the production environment). Login, go to Profile > Security and tap 'API keys'. The freshly created API key can be assigned to one or multiple IP addresses using POST device-server within 4 hours before becoming invalid. As soon as you start using your API key, it will remain valid until the next sandbox reset. For the secret, use the API key you received.
3. POST session-server
To make any calls besides installation and device-server, you need to open a session.
Headers
Use the token you received from POST /installation in the X-Bunq-Client-Authentication header. Make sure you sign your call, passing the call signature in X-Bunq-Client-Signature header.
Body
For the secret, use the API key you received.
Response
The token received in the response to POST /session-server should be used to authenticate your calls in this session. Pass this session's token in the X-Bunq-Client-Authentication header on every call you make in this session.
Quickstart: Payment Request
Goal
You want to offer bunq payments on a website or in an application.
Scenario
In this use case the consumer and the merchant both have a bunq account. The consumer wants to pay with bunq and enters their alias in the bunq payment field at checkout. The merchant sends the request for payment to the consumer when the consumer presses enter. The consumer agrees to the request in the bunq mobile app and the merchant has immediate confirmation of the payment. Please be aware that if you will gain access to account information of other bunq users or initiate a payment for them, you require a PSD2 permit.
Before you start
Make sure that you have opened a session and that for any call you make after that, you pass the session’s token in the X-Bunq-Client-Authentication header.
Call Sequence
The consumer is at checkout and selects the bunq payment method. This would be a logical time to open a session on the bunq server.
1. LIST monetary-account
When a request for payment is accepted, the money will be deposited on the bank account the request for payment is connected to. Let’s start by finding all your available bank accounts. Pick one of them to make the request for payment with and save its id.
2. POST monetary-account attachment (optional)
Optionally, you can attach an image to the request for payment.
Headers
Make sure you set the Content-Type header to match the MIME type of the image. It’s also required you pass a description of the image via the X-Bunq-Attachment-Description header.
Body
The payload of this request is the binary representation of the image file. Do not use any JSON formatting.
Response
Save the id of the posted attachment. You’ll need it to attach it to the request for payment.
3. POST request-inquiry
Next, create a request inquiry. A request inquiry is the request for payment that your customer can respond to by accepting or rejecting it.
Body
Pass the customer’s email address, phone number or IBAN in the counterparty_alias. Make sure you set the correct type for the alias, depending on what you pass. When providing an IBAN, a name of the counterparty_alias is required. You can provide the id of the created attachment.
Response
You will receive the id of the created request inquiry in the response. Save this id. You will need it to check if the customer has responded to the request yet.
4. GET request-inquiry
After you’ve sent the request for payment, its status can be checked.
Response
When the status is ACCEPTED, the customer has accepted and paid the request, and you will have received the money on the connected monetary account. If the status is REJECTED, the customer did not accept the request.
Quickstart: Create a Tab payment
Goal
You will create a tab that can be paid once by a single user, a so called TagUsageSingle, and explore three different ways to make the Tab visible to your customers:
- QR code from the CashRegister
- QR code from the Tab.
Before you start
Make sure that you have opened a session and that for any call you make after that, you pass the session’s token in the X-Bunq-Client-Authentication header.
Call sequence
1. POST attachment-public
Start by creating an attachment that will be used for the avatar for the cash register.
Header
Make sure you set the Content-Type header to match the MIME type of the image. It is also required you pass a description of the image via the X-Bunq-Attachment-Description header.
Body
The payload of this request is the binary representation of the image file. Do not use any JSON formatting.
Response
Save the uuid of the posted attachment. You'll need it to create the avatar in the next step.
2. POST avatar
Make an avatar using the public attachment you've just created.
Body
The payload of this request is the uuid of the attachment public.
Response
In response, you’ll receive the UUID of the avatar created using the attachment. Save this UUID. You’ll use it as the avatar for the cash register you're about to create.
3. LIST monetary-account
Get a listing of all available monetary accounts. Choose one, and save the id of the monetary account you want your cash register to be connected to. Each paid tab for the cash register will transfer the money to this account.
4a. POST cash-register
Create a cash register. Use the id of the monetary account you want to connect the cash register to in the URL of the request.
Body
In the body provide the uuid of the avatar you created for this cash register. Also make sure to provide a unique name for your cash register. Set the status to PENDING_APPROVAL.
Response
The response contains the id of the cash register you created. Save this id. You will need it to create subsequent tabs and tab items.
4b. Wait for approval
On the production environment, a bunq admin will review and approve your cash register. In the sandbox environment, your cash register will be automatically approved.
5. POST tab-usage-single
Create a new tab that is connected to your cash register. Use the id of the cash register you want to connect this tab to in the URL of your request.
Body
Give the tab a name in merchant_reference. Create the tab with status OPEN, and give the tab a starting amount. You can update this amount later.
Response
The response contains the uuid of the tab you created.
6. POST tab-item (optional)
You can add items to a tab. For instance, if a customer will be paying for multiple products via this tab, you can decide to add an item for each of these. Adding items to a tab is optional, and adding them will not change the total amount of the tab itself. However, if you've added any tab items the sum of the amounts of these items must be equal to the total_amount of the tab when you change its status to WAITING_FOR_PAYMENT.
7. PUT tab-usage-single
Update the status of the tab to WAITING_FOR_PAYMENT if you want the costumer to pay the tab, and you're done adding any tab items. You can use this request to make the tab visible for your costumers.
Visibility
To decide how you are going to make your tab visible, pass a visibility object in the payload.
Setting cash_register_qr_code to true will connect this tab to the QR code from the cash register. If this cash register does not have a QR code yet, one will be created. Only one Tab can be connected to the cash register’s QR code at any given time.
Setting tab_qr_code to true will create a QR code specifically for this tab. This QR code can not be linked to anything else.
Quickstart: Create a TransferWise payment
Goal
You want to send a payment in currency other than euro outside the SEPA zone.
Before you start
Make sure that you have opened a session and that for any call you make after that, you pass the session’s token in the X-Bunq-Client-Authentication header.
ℹ️ bunq relies on TransferWise for international, so you need to create a TransferWise account linked to a bunq account to be able to create international transfers. You can do it either from the bunq app or using our API as described below.
Get the up-to-date exchange rate (optional)
You might want to check the latest currency exchange rate before making a transfer. Here’s how you can do it using the bunq API:
- Check the list of supported currencies via
GET /user/{userID}/transferwise-currency. Copy the needed currency code. - Create a temporary quote for the currency of your choice via
POST /user/{userID}/transferwise-quote-temporary.
ℹ️ A quote is the exchange rate at the exact timestamp. Temporary quotes carry solely informative value and cannot be used for creating a transfer.
- Read the temporary quote via
GET /user/{userID}/transferwise-quote-temporary/{transferwise-quote-temporaryID}.
Create a TransferWise account
You need a TransferWise account linked to your bunq account to make TransferWise payments via the bunq API. Create one via POST /user/{userID}/transferwise-user, and save its ID.
ℹ️ You cannot use an existing TransferWise account.
Create a quote
- Create a quote via POST /user/{userID}/transferwise-quote and save its ID.
ℹ️ Use amount_target to indicate the sum the recipient must get. Amount_source, on the other hand, will indicate the sum you want to send, but it will not necessarily be the final sum the recipient gets.
ℹ️ Quotes are valid for 30 minutes so if you do not manage to create a transfer within this time, you will need to create another quote.
- Get the exchange rate by reading the quote via GET /user/{userID}/transferwise-quote/(transferwise-quoteID).
Create a recipient
If you have sent money via the TransferWise account linked to your bunq account, you can reuse the recipients. You can list their IDs via GET /user/{userID}/transferwise-quote/{transferwise-quoteID}/transferwise-recipient.
To create a new, previously unused recipient, follow these steps:
- Retrieve the fields required for creating the recipient as the requirements vary for the type of recipient in each country. Iterate sending the following request pair till there are no more required fields:
GET /user/{userID}/transferwise-quote/{transferwise-quoteID}/transferwise-recipient-requirementPOST /user/{userID}/transferwise-quote/{transferwise-quoteID}/transferwise-recipient-requirement
- Create a recipient account using the final request body from the previous step with
POST /user/{userID}/transferwise-quote/{transferwise-quoteID}/transferwise-recipient-requirement
Create a transfer
Finally, having both the quote ID and the recipient ID, you can create a transfer. 🎉
- Check if there are any additional transfer requirements via
POST /user/{userID}/transferwise-quote/{transferwise-quoteID}/transferwise-transfer-requirement. - Create a transfer via
POST /user/{userID}/transferwise-quote/{transferwise-quoteID}/transferwise-transfer. You need to specify the ID of the monetary account from which you want the payment to be made.
Quickstart: Downloading attachments
Goal
Export receipts and invoices attached to payments to your application.
The scenario you want to achieve
- The bunq user has accepted the authorization request and your application can read the bunq user’s account information.
- Your application imports all the transactions and attachments.
- The bunq user sees the transactions matched with the receipts and invoices in your application.
Before you start
- Make sure that you have opened a session
- Make sure you pass the session Token in the X-Bunq-Client-Authentication header in all the following requests of the session.
Call sequence
- List the payments of the user via GET /user/{userID}/monetary-account/{monetary-accountID}/payment.
- Check if the payments have attachments via GET /user/{userID}/monetary-account/{monetary-accountID}/payment/{paymentID}/note-attachment. Save the attachment IDs.
- Export the raw content of the attachments via GET /user/{userID}/attachment/{attachmentID}/content.
HINT: You can use to make sure you don’t miss anything happening on the bunq account. *_
https://oauth.bunq.com/auth?response_type=code&client_id=1cc540b6e7a4fa3a862620d0751771500ed453b0bef89cd60e36b7db6260f813&redirect_uri=https://www.bunq.com&state=594f5548-6dfb-4b02-8620-08e03a9469e6https://www.bunq.com/?code=7d272be434a75933f40c13d56aef6c31496005b653074f7d6ac57029d9995d30&state=594f5548-6dfb-4b02-8620-08e03a9469e6https://api.oauth.bunq.com/v1/token?grant_type=authorization_code&code=7d272be434a75933f40c13d56aef6c31496005b653074f7d6ac57029d9995d30&redirect_uri=https://www.bunq.com/&client_id=1cc540b6e7a4fa3a862620d0751771500ed453b0bef89cd60e36b7db6260f813&client_secret=184f969765f6f74f53bf563ae3e9f891aec9179157601d25221d57f2f1151fd5{ "access_token": "8baec0ac1aafca3345d5b811042feecfe0272514c5d09a69b5fbc84cb1c06029", "token_type": "bearer", "state": "594f5548-6dfb-4b02-8620-08e03a9469e6"}{ "error": "invalid_grant", "error_description": "The authorization code is invalid or expired."}https://api.bunq.com/user/{userApiKey's userId}/monetary-account/{grantedByUser's monetary-accountId}/paymentopenssl req -x509 -newkey rsa:4096 -keyout key.pem -out cert.pem -days 365 -nodes -subj '/CN=My App PISP AISP/C=NL'{ "amount": { "value": "12.50", "currency": "EUR" }, "counterparty_alias": { "type": "EMAIL", "value": "bravo@bunq.com" }, "description": "Payment for drinks."}{ "amount": { "value": "12.50", "currency": "EUR" }, "counterparty_alias": { "type": "EMAIL", "value": "bravo@bunq.com" }, "description": "Payment for drinks."}{ "Response": [ { "Id": { "id": 1561 } } ]}{"Response":[{"Id":{"id":1561}}]}{ "Response": [ { "DataObject": {} } ]}{ "Error": [ { "error_description": "Error description", "error_description_translated": "User facing error description" } ]}{ "content": { "ChatMessageContentText": { "text": "Hi! This is an automated security message. We saw you just logged in on an My Device Description. If you believe someone else logged in with your account, please get in touch with Support." } }}{ "notification_filters":[ { "category":"SCHEDULE_RESULT" } ]}{ "notification_filters":[ { "category":"PAYMENT", "notification_target":"{YOUR_CALLBACK_URL}" } ]}{ "notification_filters": []}{ "Pagination": { "future_url": null, "newer_url": "/v1/user/1/monetary-account/1/payment?count=25&newer_id=249", "older_url": "/v1/user/1/monetary-account/1/payment?count=25&older_id=224" }}curl https://public-api.sandbox.bunq.com/v1/sandbox-user-person -X POST --header "Content-Type: application/json" --header "Cache-Control: none" --header "User-Agent: curl-request" --header "X-Bunq-Client-Request-Id: $(date)randomId" --header "X-Bunq-Language: nl_NL" --header "X-Bunq-Region: nl_NL" --header "X-Bunq-Geolocation: 0 0 0 0 000"{ "amount_inquired": { "value": "100", "currency": "EUR" }, "counterparty_alias": { "type": "EMAIL", "value": "sugardaddy@bunq.com", "name": "Sugar Daddy" }, "description": "You're the best!", "allow_bunqme": false}- Homepage
- https://api.apis.guru/v2/specs/bunq.com/1.0.json
- Provider
- bunq.com
- OpenAPI version
- 3.0.0
- Spec (JSON)
- https://api.apis.guru/v2/specs/bunq.com/1.0/openapi.json
- Spec (YAML)
- https://api.apis.guru/v2/specs/bunq.com/1.0/openapi.yaml
Tools (423)
Extracted live via the executor SDK.
-
attachment.createAttachmentForUserMonetaryAccountCreate a new monetary account attachment. Create a POST request with a payload that contains the binary representation of the file, without any JSON wrapping. Make sure you define the MIME type (i.e. image/jpeg) in the Content-Type header. You are required to provide a description of the attachment using the X-Bunq-Attachment-Description header.
-
attachment.readAttachmentForUserGet a specific attachment. The header of the response contains the content-type of the attachment.
-
attachmentPublic.createAttachmentPublicCreate a new public attachment. Create a POST request with a payload that contains a binary representation of the file, without any JSON wrapping. Make sure you define the MIME type (i.e. image/jpeg, or image/png) in the Content-Type header. You are required to provide a description of the attachment using the X-Bunq-Attachment-Description header.
-
attachmentPublic.readAttachmentPublicGet a specific attachment's metadata through its UUID. The Content-Type header of the response will describe the MIME type of the attachment file.
-
avatar.createAvatarAvatars are public images used to represent you or your company. Avatars are used to represent users, monetary accounts and cash registers. Avatars cannot be deleted, only replaced. Avatars can be updated after uploading the image you would like to use through AttachmentPublic. Using the attachment_public_uuid which is returned you can update your Avatar. Avatars used for cash registers and company accounts will be reviewed by bunq.
-
avatar.readAvatarAvatars are public images used to represent you or your company. Avatars are used to represent users, monetary accounts and cash registers. Avatars cannot be deleted, only replaced. Avatars can be updated after uploading the image you would like to use through AttachmentPublic. Using the attachment_public_uuid which is returned you can update your Avatar. Avatars used for cash registers and company accounts will be reviewed by bunq.
-
billingContractSubscription.listAllBillingContractSubscriptionForUserGet all subscription billing contract for the authenticated user.
-
bunqmeFundraiserProfile.listAllBunqmeFundraiserProfileForUserbunq.me public profile of the user.
-
bunqmeFundraiserProfile.readBunqmeFundraiserProfileForUserbunq.me public profile of the user.
-
bunqmeFundraiserResult.readBunqmeFundraiserResultForUserMonetaryAccountbunq.me fundraiser result containing all payments.
-
bunqmeTab.createBunqmeTabForUserMonetaryAccountbunq.me tabs allows you to create a payment request and share the link through e-mail, chat, etc. Multiple persons are able to respond to the payment request and pay through bunq, iDeal or SOFORT.
-
bunqmeTab.listAllBunqmeTabForUserMonetaryAccountbunq.me tabs allows you to create a payment request and share the link through e-mail, chat, etc. Multiple persons are able to respond to the payment request and pay through bunq, iDeal or SOFORT.
-
bunqmeTab.readBunqmeTabForUserMonetaryAccountbunq.me tabs allows you to create a payment request and share the link through e-mail, chat, etc. Multiple persons are able to respond to the payment request and pay through bunq, iDeal or SOFORT.
-
bunqmeTab.updateBunqmeTabForUserMonetaryAccountbunq.me tabs allows you to create a payment request and share the link through e-mail, chat, etc. Multiple persons are able to respond to the payment request and pay through bunq, iDeal or SOFORT.
-
bunqmeTabResultResponse.readBunqmeTabResultResponseForUserMonetaryAccountUsed to view bunq.me TabResultResponse objects belonging to a tab. A TabResultResponse is an object that holds details on a tab which has been paid from the provided monetary account.
-
callbackUrl.createCallbackUrlForUserOauthClientUsed for managing OAuth Client Callback URLs.
-
callbackUrl.deleteCallbackUrlForUserOauthClientUsed for managing OAuth Client Callback URLs.
-
callbackUrl.listAllCallbackUrlForUserOauthClientUsed for managing OAuth Client Callback URLs.
-
callbackUrl.readCallbackUrlForUserOauthClientUsed for managing OAuth Client Callback URLs.
-
callbackUrl.updateCallbackUrlForUserOauthClientUsed for managing OAuth Client Callback URLs.
-
card.listAllCardForUserReturn all the cards available to the user.
-
card.readCardForUserReturn the details of a specific card.
-
card.updateCardForUserUpdate the card details. Allow to change pin code, status, limits, country permissions and the monetary account connected to the card. When the card has been received, it can be also activated through this endpoint.
-
cardBatch.createCardBatchForUserUsed to update multiple cards in a batch.
-
cardBatchReplace.createCardBatchReplaceForUserUsed to replace multiple cards in a batch.
-
cardCredit.createCardCreditForUserCreate a new credit card request.
-
cardDebit.createCardDebitForUserCreate a new debit card request.
-
cardName.listAllCardNameForUserReturn all the accepted card names for a specific user.
-
certificatePinned.createCertificatePinnedForUserPin the certificate chain.
-
certificatePinned.deleteCertificatePinnedForUserRemove the pinned certificate chain with the specific ID.
-
certificatePinned.listAllCertificatePinnedForUserList all the pinned certificate chain for the given user.
-
certificatePinned.readCertificatePinnedForUserGet the pinned certificate chain with the specified ID.
-
challengeRequest.readChallengeRequestForUserEndpoint for apps to fetch a challenge request.
-
challengeRequest.updateChallengeRequestForUserEndpoint for apps to fetch a challenge request.
-
company.createCompanyForUserCreate and manage companies.
-
company.listAllCompanyForUserCreate and manage companies.
-
company.readCompanyForUserCreate and manage companies.
-
company.updateCompanyForUserCreate and manage companies.
-
confirmationOfFunds.createConfirmationOfFundsForUserUsed to confirm availability of funds on an account.
-
content.listAllContentForAttachmentPublicGet the raw content of a specific attachment.
-
content.listAllContentForPlaceLookupPhotoView endpoint for place opening periods.
-
content.listAllContentForUserAttachmentGet the raw content of a specific attachment.
-
content.listAllContentForUserCardExportStatementCardFetch the raw content of a card statement export. The returned file format could be CSV or PDF depending on the statement format specified during the statement creation. The doc won't display the response of a request to get the content of a statement export.
-
content.listAllContentForUserChatConversationAttachmentGet the raw content of a specific attachment.
-
content.listAllContentForUserExportAnnualOverviewUsed to retrieve the raw content of an annual overview.
-
content.listAllContentForUserMonetaryAccountAttachmentGet the raw content of a specific attachment.
-
content.listAllContentForUserMonetaryAccountCustomerStatementFetch the raw content of a statement export. The returned file format could be MT940, CSV or PDF depending on the statement format specified during the statement creation. The doc won't display the response of a request to get the content of a statement export.
-
content.listAllContentForUserMonetaryAccountEventStatementFetch the raw content of a payment statement export.
-
content.listAllContentForUserMonetaryAccountExportRibUsed to retrieve the raw content of an RIB.
-
credentialPasswordIp.listAllCredentialPasswordIpForUserCreate a credential of a user for server authentication, or delete the credential of a user for server authentication.
-
credentialPasswordIp.readCredentialPasswordIpForUserCreate a credential of a user for server authentication, or delete the credential of a user for server authentication.
-
currencyCloudBeneficiary.createCurrencyCloudBeneficiaryForUserEndpoint to manage CurrencyCloud beneficiaries.
-
currencyCloudBeneficiary.listAllCurrencyCloudBeneficiaryForUserEndpoint to manage CurrencyCloud beneficiaries.
-
currencyCloudBeneficiary.readCurrencyCloudBeneficiaryForUserEndpoint to manage CurrencyCloud beneficiaries.
-
currencyCloudBeneficiaryRequirement.listAllCurrencyCloudBeneficiaryRequirementForUserEndpoint to list requirements for CurrencyCloud beneficiaries.
-
currencyCloudPaymentQuote.createCurrencyCloudPaymentQuoteForUserMonetaryAccountEndpoint for managing currency conversions.
-
currencyConversion.listAllCurrencyConversionForUserMonetaryAccountEndpoint for managing currency conversions.
-
currencyConversion.readCurrencyConversionForUserMonetaryAccountEndpoint for managing currency conversions.
-
currencyConversionQuote.createCurrencyConversionQuoteForUserMonetaryAccountEndpoint to create a quote for currency conversions.
-
currencyConversionQuote.readCurrencyConversionQuoteForUserMonetaryAccountEndpoint to create a quote for currency conversions.
-
currencyConversionQuote.updateCurrencyConversionQuoteForUserMonetaryAccountEndpoint to create a quote for currency conversions.
-
customerStatement.createCustomerStatementForUserMonetaryAccountUsed to create new and read existing statement exports. Statement exports can be created in either CSV, MT940 or PDF file format.
-
customerStatement.deleteCustomerStatementForUserMonetaryAccountUsed to create new and read existing statement exports. Statement exports can be created in either CSV, MT940 or PDF file format.
-
customerStatement.listAllCustomerStatementForUserMonetaryAccountUsed to create new and read existing statement exports. Statement exports can be created in either CSV, MT940 or PDF file format.
-
customerStatement.readCustomerStatementForUserMonetaryAccountUsed to create new and read existing statement exports. Statement exports can be created in either CSV, MT940 or PDF file format.
-
definition.listAllDefinitionForUserMonetaryAccountPaymentAutoAllocateList all the definitions in a payment auto allocate.
-
device.listAllDeviceGet a collection of Devices. A Device is either a DevicePhone or a DeviceServer.
-
device.readDeviceGet a single Device. A Device is either a DevicePhone or a DeviceServer.
-
deviceServer.createDeviceServerCreate a new DeviceServer providing the installation token in the header and signing the request with the private part of the key you used to create the installation. The API Key that you are using will be bound to the IP address of the DeviceServer which you have created.
Using a Wildcard API Key gives you the freedom to make API calls even if the IP address has changed after the POST device-server.
Find out more at this link . -
deviceServer.listAllDeviceServerGet a collection of all the DeviceServers you have created.
-
deviceServer.readDeviceServerGet one of your DeviceServers.
-
draftPayment.createDraftPaymentForUserMonetaryAccountCreate a new DraftPayment.
-
draftPayment.listAllDraftPaymentForUserMonetaryAccountGet a listing of all DraftPayments from a given MonetaryAccount.
-
draftPayment.readDraftPaymentForUserMonetaryAccountGet a specific DraftPayment.
-
draftPayment.updateDraftPaymentForUserMonetaryAccountUpdate a DraftPayment.
-
event.listAllEventForUserGet a collection of events for a given user. You can add query the parameters monetary_account_id, status and/or display_user_event to filter the response. When monetary_account_id={id,id} is provided only events that relate to these monetary account ids are returned. When status={AWAITING_REPLY/FINALIZED} is provided the response only contains events with the status AWAITING_REPLY or FINALIZED. When display_user_event={true/false} is set to false user events are excluded from the response, when not provided user events are displayed. User events are events that are not related to a monetary account (for example: connect invites).
-
event.readEventForUserGet a specific event for a given user.
-
exportAnnualOverview.createExportAnnualOverviewForUserCreate a new annual overview for a specific year. An overview can be generated only for a past year.
-
exportAnnualOverview.deleteExportAnnualOverviewForUserUsed to create new and read existing annual overviews of all the user's monetary accounts. Once created, annual overviews can be downloaded in PDF format via the 'export-annual-overview/{id}/content' endpoint.
-
exportAnnualOverview.listAllExportAnnualOverviewForUserList all the annual overviews for a user.
-
exportAnnualOverview.readExportAnnualOverviewForUserGet an annual overview for a user by its id.
-
exportRib.createExportRibForUserMonetaryAccountCreate a new RIB.
-
exportRib.deleteExportRibForUserMonetaryAccountUsed to create new and read existing RIBs of a monetary account
-
exportRib.listAllExportRibForUserMonetaryAccountList all the RIBs for a monetary account.
-
exportRib.readExportRibForUserMonetaryAccountGet a RIB for a monetary account by its id.
-
exportStatementCard.listAllExportStatementCardForUserCardUsed to create new and read existing card statement exports. Statement exports can be created in either CSV or PDF file format.
-
exportStatementCard.readExportStatementCardForUserCardUsed to create new and read existing card statement exports. Statement exports can be created in either CSV or PDF file format.
-
exportStatementCardCsv.createExportStatementCardCsvForUserCardUsed to serialize ExportStatementCardCsv
-
exportStatementCardCsv.deleteExportStatementCardCsvForUserCardUsed to serialize ExportStatementCardCsv
-
exportStatementCardCsv.listAllExportStatementCardCsvForUserCardUsed to serialize ExportStatementCardCsv
-
exportStatementCardCsv.readExportStatementCardCsvForUserCardUsed to serialize ExportStatementCardCsv
-
exportStatementCardPdf.createExportStatementCardPdfForUserCardUsed to serialize ExportStatementCardPdf
-
exportStatementCardPdf.deleteExportStatementCardPdfForUserCardUsed to serialize ExportStatementCardPdf
-
exportStatementCardPdf.listAllExportStatementCardPdfForUserCardUsed to serialize ExportStatementCardPdf
-
exportStatementCardPdf.readExportStatementCardPdfForUserCardUsed to serialize ExportStatementCardPdf
-
featureAnnouncement.readFeatureAnnouncementForUserview for updating the feature display.
-
generatedCvc2.createGeneratedCvc2ForUserCardGenerate a new CVC2 code for a card.
-
generatedCvc2.listAllGeneratedCvc2ForUserCardGet all generated CVC2 codes for a card.
-
generatedCvc2.readGeneratedCvc2ForUserCardGet the details for a specific generated CVC2 code.
-
generatedCvc2.updateGeneratedCvc2ForUserCardEndpoint for generating and retrieving a new CVC2 code.
-
idealMerchantTransaction.createIdealMerchantTransactionForUserMonetaryAccountView for requesting iDEAL transactions and polling their status.
-
idealMerchantTransaction.listAllIdealMerchantTransactionForUserMonetaryAccountView for requesting iDEAL transactions and polling their status.
-
idealMerchantTransaction.readIdealMerchantTransactionForUserMonetaryAccountView for requesting iDEAL transactions and polling their status.
-
insightPreferenceDate.listAllInsightPreferenceDateForUserUsed to allow users to set insight/budget preferences.
-
insights.listAllInsightsForUserUsed to get insights about transactions between given time range.
-
insightsSearch.listAllInsightsSearchForUserUsed to get events based on time and insight category.
-
installation.createInstallationThis is the only API call that does not require you to use the "X-Bunq-Client-Authentication" and "X-Bunq-Client-Signature" headers. You provide the server with the public part of the key pair that you are going to use to create the value of the signature header for all future API calls. The server creates an installation for you. Store the Installation Token and ServerPublicKey from the response. This token is used in the "X-Bunq-Client-Authentication" header for the creation of a DeviceServer and SessionServer.
-
installation.listAllInstallationYou must have an active session to make this call. This call returns the Id of the the Installation you are using in your session.
-
installation.readInstallationYou must have an active session to make this call. This call is used to check whether the Id you provide is the Id of your current installation or not.
-
instance.listAllInstanceForUserMonetaryAccountPaymentAutoAllocateList all the times a users payment was automatically allocated.
-
instance.readInstanceForUserMonetaryAccountPaymentAutoAllocateList all the times a users payment was automatically allocated.
-
invoice.listAllInvoiceForUserUsed to list bunq invoices by user.
-
invoice.listAllInvoiceForUserMonetaryAccountUsed to view a bunq invoice.
-
invoice.readInvoiceForUserUsed to list bunq invoices by user.
-
invoice.readInvoiceForUserMonetaryAccountUsed to view a bunq invoice.
-
ip.createIpForUserCredentialPasswordIpManage the IPs which may be used for a credential of a user for server authentication.
-
ip.listAllIpForUserCredentialPasswordIpManage the IPs which may be used for a credential of a user for server authentication.
-
ip.readIpForUserCredentialPasswordIpManage the IPs which may be used for a credential of a user for server authentication.
-
ip.updateIpForUserCredentialPasswordIpManage the IPs which may be used for a credential of a user for server authentication.
-
legalName.listAllLegalNameForUserEndpoint for getting available legal names that can be used by the user.
-
limit.listAllLimitForUserGet all limits for the authenticated user.
-
mastercardAction.listAllMastercardActionForUserMonetaryAccountMasterCard transaction view.
-
mastercardAction.readMastercardActionForUserMonetaryAccountMasterCard transaction view.
-
monetaryAccount.listAllMonetaryAccountForUserGet a collection of all your MonetaryAccounts.
-
monetaryAccount.readMonetaryAccountForUserGet a specific MonetaryAccount.
-
monetaryAccountBank.createMonetaryAccountBankForUserCreate new MonetaryAccountBank.
-
monetaryAccountBank.listAllMonetaryAccountBankForUserGets a listing of all MonetaryAccountBanks of a given user.
-
monetaryAccountBank.readMonetaryAccountBankForUserGet a specific MonetaryAccountBank.
-
monetaryAccountBank.updateMonetaryAccountBankForUserUpdate a specific existing MonetaryAccountBank.
-
monetaryAccountExternal.listAllMonetaryAccountExternalForUserEndpoint for managing monetary accounts which are connected to external services.
-
monetaryAccountExternal.readMonetaryAccountExternalForUserEndpoint for managing monetary accounts which are connected to external services.
-
monetaryAccountJoint.createMonetaryAccountJointForUserThe endpoint for joint monetary accounts.
-
monetaryAccountJoint.listAllMonetaryAccountJointForUserThe endpoint for joint monetary accounts.
-
monetaryAccountJoint.readMonetaryAccountJointForUserThe endpoint for joint monetary accounts.
-
monetaryAccountJoint.updateMonetaryAccountJointForUserThe endpoint for joint monetary accounts.
-
monetaryAccountSavings.createMonetaryAccountSavingsForUserCreate new MonetaryAccountSavings.
-
monetaryAccountSavings.listAllMonetaryAccountSavingsForUserGets a listing of all MonetaryAccountSavingss of a given user.
-
monetaryAccountSavings.readMonetaryAccountSavingsForUserGet a specific MonetaryAccountSavings.
-
monetaryAccountSavings.updateMonetaryAccountSavingsForUserUpdate a specific existing MonetaryAccountSavings.
-
name.listAllNameForUserCompanyReturn all the known (trade) names for a specific user company.
-
noteAttachment.createNoteAttachmentForUserMonetaryAccountBunqmeFundraiserResultUsed to manage attachment notes.
-
noteAttachment.createNoteAttachmentForUserMonetaryAccountDraftPaymentUsed to manage attachment notes.
-
noteAttachment.createNoteAttachmentForUserMonetaryAccountIdealMerchantTransactionUsed to manage attachment notes.
-
noteAttachment.createNoteAttachmentForUserMonetaryAccountMastercardActionUsed to manage attachment notes.
-
noteAttachment.createNoteAttachmentForUserMonetaryAccountPaymentUsed to manage attachment notes.
-
noteAttachment.createNoteAttachmentForUserMonetaryAccountPaymentBatchUsed to manage attachment notes.
-
noteAttachment.createNoteAttachmentForUserMonetaryAccountRequestInquiryUsed to manage attachment notes.
-
noteAttachment.createNoteAttachmentForUserMonetaryAccountRequestInquiryBatchUsed to manage attachment notes.
-
noteAttachment.createNoteAttachmentForUserMonetaryAccountRequestResponseUsed to manage attachment notes.
-
noteAttachment.createNoteAttachmentForUserMonetaryAccountSchedulePaymentUsed to manage attachment notes.
-
noteAttachment.createNoteAttachmentForUserMonetaryAccountSchedulePaymentBatchUsed to manage attachment notes.
-
noteAttachment.createNoteAttachmentForUserMonetaryAccountScheduleScheduleInstanceUsed to manage attachment notes.
-
noteAttachment.createNoteAttachmentForUserMonetaryAccountSofortMerchantTransactionUsed to manage attachment notes.
-
noteAttachment.createNoteAttachmentForUserMonetaryAccountSwitchServicePaymentUsed to manage attachment notes.
-
noteAttachment.createNoteAttachmentForUserMonetaryAccountWhitelistWhitelistResultUsed to manage attachment notes.
-
noteAttachment.deleteNoteAttachmentForUserMonetaryAccountBunqmeFundraiserResultUsed to manage attachment notes.
-
noteAttachment.deleteNoteAttachmentForUserMonetaryAccountDraftPaymentUsed to manage attachment notes.
-
noteAttachment.deleteNoteAttachmentForUserMonetaryAccountIdealMerchantTransactionUsed to manage attachment notes.
-
noteAttachment.deleteNoteAttachmentForUserMonetaryAccountMastercardActionUsed to manage attachment notes.
-
noteAttachment.deleteNoteAttachmentForUserMonetaryAccountPaymentUsed to manage attachment notes.
-
noteAttachment.deleteNoteAttachmentForUserMonetaryAccountPaymentBatchUsed to manage attachment notes.
-
noteAttachment.deleteNoteAttachmentForUserMonetaryAccountRequestInquiryUsed to manage attachment notes.
-
noteAttachment.deleteNoteAttachmentForUserMonetaryAccountRequestInquiryBatchUsed to manage attachment notes.
-
noteAttachment.deleteNoteAttachmentForUserMonetaryAccountRequestResponseUsed to manage attachment notes.
-
noteAttachment.deleteNoteAttachmentForUserMonetaryAccountSchedulePaymentUsed to manage attachment notes.
-
noteAttachment.deleteNoteAttachmentForUserMonetaryAccountSchedulePaymentBatchUsed to manage attachment notes.
-
noteAttachment.deleteNoteAttachmentForUserMonetaryAccountScheduleScheduleInstanceUsed to manage attachment notes.
-
noteAttachment.deleteNoteAttachmentForUserMonetaryAccountSofortMerchantTransactionUsed to manage attachment notes.
-
noteAttachment.deleteNoteAttachmentForUserMonetaryAccountSwitchServicePaymentUsed to manage attachment notes.
-
noteAttachment.deleteNoteAttachmentForUserMonetaryAccountWhitelistWhitelistResultUsed to manage attachment notes.
-
noteAttachment.listAllNoteAttachmentForUserMonetaryAccountBunqmeFundraiserResultManage the notes for a given user.
-
noteAttachment.listAllNoteAttachmentForUserMonetaryAccountDraftPaymentManage the notes for a given user.
-
noteAttachment.listAllNoteAttachmentForUserMonetaryAccountIdealMerchantTransactionManage the notes for a given user.
-
noteAttachment.listAllNoteAttachmentForUserMonetaryAccountMastercardActionManage the notes for a given user.
-
noteAttachment.listAllNoteAttachmentForUserMonetaryAccountPaymentManage the notes for a given user.
-
noteAttachment.listAllNoteAttachmentForUserMonetaryAccountPaymentBatchManage the notes for a given user.
-
noteAttachment.listAllNoteAttachmentForUserMonetaryAccountRequestInquiryManage the notes for a given user.
-
noteAttachment.listAllNoteAttachmentForUserMonetaryAccountRequestInquiryBatchManage the notes for a given user.
-
noteAttachment.listAllNoteAttachmentForUserMonetaryAccountRequestResponseManage the notes for a given user.
-
noteAttachment.listAllNoteAttachmentForUserMonetaryAccountSchedulePaymentManage the notes for a given user.
-
noteAttachment.listAllNoteAttachmentForUserMonetaryAccountSchedulePaymentBatchManage the notes for a given user.
-
noteAttachment.listAllNoteAttachmentForUserMonetaryAccountScheduleScheduleInstanceManage the notes for a given user.
-
noteAttachment.listAllNoteAttachmentForUserMonetaryAccountSofortMerchantTransactionManage the notes for a given user.
-
noteAttachment.listAllNoteAttachmentForUserMonetaryAccountSwitchServicePaymentManage the notes for a given user.
-
noteAttachment.listAllNoteAttachmentForUserMonetaryAccountWhitelistWhitelistResultManage the notes for a given user.
-
noteAttachment.readNoteAttachmentForUserMonetaryAccountBunqmeFundraiserResultUsed to manage attachment notes.
-
noteAttachment.readNoteAttachmentForUserMonetaryAccountDraftPaymentUsed to manage attachment notes.
-
noteAttachment.readNoteAttachmentForUserMonetaryAccountIdealMerchantTransactionUsed to manage attachment notes.
-
noteAttachment.readNoteAttachmentForUserMonetaryAccountMastercardActionUsed to manage attachment notes.
-
noteAttachment.readNoteAttachmentForUserMonetaryAccountPaymentUsed to manage attachment notes.
-
noteAttachment.readNoteAttachmentForUserMonetaryAccountPaymentBatchUsed to manage attachment notes.
-
noteAttachment.readNoteAttachmentForUserMonetaryAccountRequestInquiryUsed to manage attachment notes.
-
noteAttachment.readNoteAttachmentForUserMonetaryAccountRequestInquiryBatchUsed to manage attachment notes.
-
noteAttachment.readNoteAttachmentForUserMonetaryAccountRequestResponseUsed to manage attachment notes.
-
noteAttachment.readNoteAttachmentForUserMonetaryAccountSchedulePaymentUsed to manage attachment notes.
-
noteAttachment.readNoteAttachmentForUserMonetaryAccountSchedulePaymentBatchUsed to manage attachment notes.
-
noteAttachment.readNoteAttachmentForUserMonetaryAccountScheduleScheduleInstanceUsed to manage attachment notes.
-
noteAttachment.readNoteAttachmentForUserMonetaryAccountSofortMerchantTransactionUsed to manage attachment notes.
-
noteAttachment.readNoteAttachmentForUserMonetaryAccountSwitchServicePaymentUsed to manage attachment notes.
-
noteAttachment.readNoteAttachmentForUserMonetaryAccountWhitelistWhitelistResultUsed to manage attachment notes.
-
noteAttachment.updateNoteAttachmentForUserMonetaryAccountBunqmeFundraiserResultUsed to manage attachment notes.
-
noteAttachment.updateNoteAttachmentForUserMonetaryAccountDraftPaymentUsed to manage attachment notes.
-
noteAttachment.updateNoteAttachmentForUserMonetaryAccountIdealMerchantTransactionUsed to manage attachment notes.
-
noteAttachment.updateNoteAttachmentForUserMonetaryAccountMastercardActionUsed to manage attachment notes.
-
noteAttachment.updateNoteAttachmentForUserMonetaryAccountPaymentUsed to manage attachment notes.
-
noteAttachment.updateNoteAttachmentForUserMonetaryAccountPaymentBatchUsed to manage attachment notes.
-
noteAttachment.updateNoteAttachmentForUserMonetaryAccountRequestInquiryUsed to manage attachment notes.
-
noteAttachment.updateNoteAttachmentForUserMonetaryAccountRequestInquiryBatchUsed to manage attachment notes.
-
noteAttachment.updateNoteAttachmentForUserMonetaryAccountRequestResponseUsed to manage attachment notes.
-
noteAttachment.updateNoteAttachmentForUserMonetaryAccountSchedulePaymentUsed to manage attachment notes.
-
noteAttachment.updateNoteAttachmentForUserMonetaryAccountSchedulePaymentBatchUsed to manage attachment notes.
-
noteAttachment.updateNoteAttachmentForUserMonetaryAccountScheduleScheduleInstanceUsed to manage attachment notes.
-
noteAttachment.updateNoteAttachmentForUserMonetaryAccountSofortMerchantTransactionUsed to manage attachment notes.
-
noteAttachment.updateNoteAttachmentForUserMonetaryAccountSwitchServicePaymentUsed to manage attachment notes.
-
noteAttachment.updateNoteAttachmentForUserMonetaryAccountWhitelistWhitelistResultUsed to manage attachment notes.
-
noteText.createNoteTextForUserMonetaryAccountBunqmeFundraiserResultUsed to manage text notes.
-
noteText.createNoteTextForUserMonetaryAccountDraftPaymentUsed to manage text notes.
-
noteText.createNoteTextForUserMonetaryAccountIdealMerchantTransactionUsed to manage text notes.
-
noteText.createNoteTextForUserMonetaryAccountMastercardActionUsed to manage text notes.
-
noteText.createNoteTextForUserMonetaryAccountPaymentUsed to manage text notes.
-
noteText.createNoteTextForUserMonetaryAccountPaymentBatchUsed to manage text notes.
-
noteText.createNoteTextForUserMonetaryAccountRequestInquiryUsed to manage text notes.
-
noteText.createNoteTextForUserMonetaryAccountRequestInquiryBatchUsed to manage text notes.
-
noteText.createNoteTextForUserMonetaryAccountRequestResponseUsed to manage text notes.
-
noteText.createNoteTextForUserMonetaryAccountSchedulePaymentUsed to manage text notes.
-
noteText.createNoteTextForUserMonetaryAccountSchedulePaymentBatchUsed to manage text notes.
-
noteText.createNoteTextForUserMonetaryAccountScheduleScheduleInstanceUsed to manage text notes.
-
noteText.createNoteTextForUserMonetaryAccountSofortMerchantTransactionUsed to manage text notes.
-
noteText.createNoteTextForUserMonetaryAccountSwitchServicePaymentUsed to manage text notes.
-
noteText.createNoteTextForUserMonetaryAccountWhitelistWhitelistResultUsed to manage text notes.
-
noteText.deleteNoteTextForUserMonetaryAccountBunqmeFundraiserResultUsed to manage text notes.
-
noteText.deleteNoteTextForUserMonetaryAccountDraftPaymentUsed to manage text notes.
-
noteText.deleteNoteTextForUserMonetaryAccountIdealMerchantTransactionUsed to manage text notes.
-
noteText.deleteNoteTextForUserMonetaryAccountMastercardActionUsed to manage text notes.
-
noteText.deleteNoteTextForUserMonetaryAccountPaymentUsed to manage text notes.
-
noteText.deleteNoteTextForUserMonetaryAccountPaymentBatchUsed to manage text notes.
-
noteText.deleteNoteTextForUserMonetaryAccountRequestInquiryUsed to manage text notes.
-
noteText.deleteNoteTextForUserMonetaryAccountRequestInquiryBatchUsed to manage text notes.
-
noteText.deleteNoteTextForUserMonetaryAccountRequestResponseUsed to manage text notes.
-
noteText.deleteNoteTextForUserMonetaryAccountSchedulePaymentUsed to manage text notes.
-
noteText.deleteNoteTextForUserMonetaryAccountSchedulePaymentBatchUsed to manage text notes.
-
noteText.deleteNoteTextForUserMonetaryAccountScheduleScheduleInstanceUsed to manage text notes.
-
noteText.deleteNoteTextForUserMonetaryAccountSofortMerchantTransactionUsed to manage text notes.
-
noteText.deleteNoteTextForUserMonetaryAccountSwitchServicePaymentUsed to manage text notes.
-
noteText.deleteNoteTextForUserMonetaryAccountWhitelistWhitelistResultUsed to manage text notes.
-
noteText.listAllNoteTextForUserMonetaryAccountBunqmeFundraiserResultManage the notes for a given user.
-
noteText.listAllNoteTextForUserMonetaryAccountDraftPaymentManage the notes for a given user.
-
noteText.listAllNoteTextForUserMonetaryAccountIdealMerchantTransactionManage the notes for a given user.
-
noteText.listAllNoteTextForUserMonetaryAccountMastercardActionManage the notes for a given user.
-
noteText.listAllNoteTextForUserMonetaryAccountPaymentManage the notes for a given user.
-
noteText.listAllNoteTextForUserMonetaryAccountPaymentBatchManage the notes for a given user.
-
noteText.listAllNoteTextForUserMonetaryAccountRequestInquiryManage the notes for a given user.
-
noteText.listAllNoteTextForUserMonetaryAccountRequestInquiryBatchManage the notes for a given user.
-
noteText.listAllNoteTextForUserMonetaryAccountRequestResponseManage the notes for a given user.
-
noteText.listAllNoteTextForUserMonetaryAccountSchedulePaymentManage the notes for a given user.
-
noteText.listAllNoteTextForUserMonetaryAccountSchedulePaymentBatchManage the notes for a given user.
-
noteText.listAllNoteTextForUserMonetaryAccountScheduleScheduleInstanceManage the notes for a given user.
-
noteText.listAllNoteTextForUserMonetaryAccountSofortMerchantTransactionManage the notes for a given user.
-
noteText.listAllNoteTextForUserMonetaryAccountSwitchServicePaymentManage the notes for a given user.
-
noteText.listAllNoteTextForUserMonetaryAccountWhitelistWhitelistResultManage the notes for a given user.
-
noteText.readNoteTextForUserMonetaryAccountBunqmeFundraiserResultUsed to manage text notes.
-
noteText.readNoteTextForUserMonetaryAccountDraftPaymentUsed to manage text notes.
-
noteText.readNoteTextForUserMonetaryAccountIdealMerchantTransactionUsed to manage text notes.
-
noteText.readNoteTextForUserMonetaryAccountMastercardActionUsed to manage text notes.
-
noteText.readNoteTextForUserMonetaryAccountPaymentUsed to manage text notes.
-
noteText.readNoteTextForUserMonetaryAccountPaymentBatchUsed to manage text notes.
-
noteText.readNoteTextForUserMonetaryAccountRequestInquiryUsed to manage text notes.
-
noteText.readNoteTextForUserMonetaryAccountRequestInquiryBatchUsed to manage text notes.
-
noteText.readNoteTextForUserMonetaryAccountRequestResponseUsed to manage text notes.
-
noteText.readNoteTextForUserMonetaryAccountSchedulePaymentUsed to manage text notes.
-
noteText.readNoteTextForUserMonetaryAccountSchedulePaymentBatchUsed to manage text notes.
-
noteText.readNoteTextForUserMonetaryAccountScheduleScheduleInstanceUsed to manage text notes.
-
noteText.readNoteTextForUserMonetaryAccountSofortMerchantTransactionUsed to manage text notes.
-
noteText.readNoteTextForUserMonetaryAccountSwitchServicePaymentUsed to manage text notes.
-
noteText.readNoteTextForUserMonetaryAccountWhitelistWhitelistResultUsed to manage text notes.
-
noteText.updateNoteTextForUserMonetaryAccountBunqmeFundraiserResultUsed to manage text notes.
-
noteText.updateNoteTextForUserMonetaryAccountDraftPaymentUsed to manage text notes.
-
noteText.updateNoteTextForUserMonetaryAccountIdealMerchantTransactionUsed to manage text notes.
-
noteText.updateNoteTextForUserMonetaryAccountMastercardActionUsed to manage text notes.
-
noteText.updateNoteTextForUserMonetaryAccountPaymentUsed to manage text notes.
-
noteText.updateNoteTextForUserMonetaryAccountPaymentBatchUsed to manage text notes.
-
noteText.updateNoteTextForUserMonetaryAccountRequestInquiryUsed to manage text notes.
-
noteText.updateNoteTextForUserMonetaryAccountRequestInquiryBatchUsed to manage text notes.
-
noteText.updateNoteTextForUserMonetaryAccountRequestResponseUsed to manage text notes.
-
noteText.updateNoteTextForUserMonetaryAccountSchedulePaymentUsed to manage text notes.
-
noteText.updateNoteTextForUserMonetaryAccountSchedulePaymentBatchUsed to manage text notes.
-
noteText.updateNoteTextForUserMonetaryAccountScheduleScheduleInstanceUsed to manage text notes.
-
noteText.updateNoteTextForUserMonetaryAccountSofortMerchantTransactionUsed to manage text notes.
-
noteText.updateNoteTextForUserMonetaryAccountSwitchServicePaymentUsed to manage text notes.
-
noteText.updateNoteTextForUserMonetaryAccountWhitelistWhitelistResultUsed to manage text notes.
-
notificationFilterEmail.createNotificationFilterEmailForUserManage the email notification filters for a user.
-
notificationFilterEmail.listAllNotificationFilterEmailForUserManage the email notification filters for a user.
-
notificationFilterPush.createNotificationFilterPushForUserManage the push notification filters for a user.
-
notificationFilterPush.listAllNotificationFilterPushForUserManage the push notification filters for a user.
-
notificationFilterUrl.createNotificationFilterUrlForUserManage the url notification filters for a user.
-
notificationFilterUrl.createNotificationFilterUrlForUserMonetaryAccountManage the url notification filters for a user.
-
notificationFilterUrl.listAllNotificationFilterUrlForUserManage the url notification filters for a user.
-
notificationFilterUrl.listAllNotificationFilterUrlForUserMonetaryAccountManage the url notification filters for a user.
-
oauthClient.createOauthClientForUserUsed for managing OAuth Clients.
-
oauthClient.listAllOauthClientForUserUsed for managing OAuth Clients.
-
oauthClient.readOauthClientForUserUsed for managing OAuth Clients.
-
oauthClient.updateOauthClientForUserUsed for managing OAuth Clients.
-
payment.createPaymentForUserMonetaryAccountCreate a new Payment.
-
payment.listAllPaymentForUserMonetaryAccountGet a listing of all Payments performed on a given MonetaryAccount (incoming and outgoing).
-
payment.listAllPaymentForUserMonetaryAccountMastercardActionMasterCard transaction view.
-
payment.readPaymentForUserMonetaryAccountGet a specific previous Payment.
-
paymentAutoAllocate.createPaymentAutoAllocateForUserMonetaryAccountManage a users automatic payment auto allocated settings.
-
paymentAutoAllocate.deletePaymentAutoAllocateForUserMonetaryAccountManage a users automatic payment auto allocated settings.
-
paymentAutoAllocate.listAllPaymentAutoAllocateForUserList a users automatic payment auto allocated settings.
-
paymentAutoAllocate.listAllPaymentAutoAllocateForUserMonetaryAccountManage a users automatic payment auto allocated settings.
-
paymentAutoAllocate.readPaymentAutoAllocateForUserMonetaryAccountManage a users automatic payment auto allocated settings.
-
paymentAutoAllocate.updatePaymentAutoAllocateForUserMonetaryAccountManage a users automatic payment auto allocated settings.
-
paymentBatch.createPaymentBatchForUserMonetaryAccountCreate a payment batch by sending an array of single payment objects, that will become part of the batch.
-
paymentBatch.listAllPaymentBatchForUserMonetaryAccountReturn all the payment batches for a monetary account.
-
paymentBatch.readPaymentBatchForUserMonetaryAccountReturn the details of a specific payment batch.
-
paymentBatch.updatePaymentBatchForUserMonetaryAccountRevoke a bunq.to payment batch. The status of all the payments will be set to REVOKED.
-
paymentServiceProviderCredential.createPaymentServiceProviderCredentialRegister a Payment Service Provider and provide credentials
-
paymentServiceProviderCredential.readPaymentServiceProviderCredentialRegister a Payment Service Provider and provide credentials
-
paymentServiceProviderDraftPayment.createPaymentServiceProviderDraftPaymentForUserManage the PaymentServiceProviderDraftPayment's for a PISP.
-
paymentServiceProviderDraftPayment.listAllPaymentServiceProviderDraftPaymentForUserManage the PaymentServiceProviderDraftPayment's for a PISP.
-
paymentServiceProviderDraftPayment.readPaymentServiceProviderDraftPaymentForUserManage the PaymentServiceProviderDraftPayment's for a PISP.
-
paymentServiceProviderDraftPayment.updatePaymentServiceProviderDraftPaymentForUserManage the PaymentServiceProviderDraftPayment's for a PISP.
-
pdfContent.listAllPdfContentForUserInvoiceGet a PDF export of an invoice.
-
registrySettlement.createRegistrySettlementForUserRegistryCreate a new Slice group settlement.
-
registrySettlement.listAllRegistrySettlementForUserRegistryGet a listing of all Slice group settlements.
-
registrySettlement.readRegistrySettlementForUserRegistryGet a specific Slice group settlement.
-
replace.createReplaceForUserCardRequest a card replacement.
-
requestInquiry.createRequestInquiryForUserMonetaryAccountCreate a new payment request.
-
requestInquiry.listAllRequestInquiryForUserMonetaryAccountGet all payment requests for a user's monetary account. bunqme_share_url is always null if the counterparty is a bunq user.
-
requestInquiry.readRequestInquiryForUserMonetaryAccountGet the details of a specific payment request, including its status. bunqme_share_url is always null if the counterparty is a bunq user.
-
requestInquiry.updateRequestInquiryForUserMonetaryAccountRevoke a request for payment, by updating the status to REVOKED.
-
requestInquiryBatch.createRequestInquiryBatchForUserMonetaryAccountCreate a request batch by sending an array of single request objects, that will become part of the batch.
-
requestInquiryBatch.listAllRequestInquiryBatchForUserMonetaryAccountReturn all the request batches for a monetary account.
-
requestInquiryBatch.readRequestInquiryBatchForUserMonetaryAccountReturn the details of a specific request batch.
-
requestInquiryBatch.updateRequestInquiryBatchForUserMonetaryAccountRevoke a request batch. The status of all the requests will be set to REVOKED.
-
requestResponse.listAllRequestResponseForUserMonetaryAccountGet all RequestResponses for a MonetaryAccount.
-
requestResponse.readRequestResponseForUserMonetaryAccountGet the details for a specific existing RequestResponse.
-
requestResponse.updateRequestResponseForUserMonetaryAccountUpdate the status to accept or reject the RequestResponse.
-
reward.listAllRewardForUserUsed to view Rewards.
-
reward.readRewardForUserUsed to view Rewards.
-
rewardRecipient.listAllRewardRecipientForUserUsed to view Rewards.
-
rewardRecipient.readRewardRecipientForUserUsed to view Rewards.
-
rewardSender.listAllRewardSenderForUserUsed to view Rewards.
-
rewardSender.readRewardSenderForUserUsed to view Rewards.
-
sandboxUserCompany.createSandboxUserCompanyUsed to create a sandbox userCompany.
-
sandboxUserPerson.createSandboxUserPersonUsed to create a sandbox userPerson.
-
schedule.listAllScheduleForUserGet a collection of scheduled definition for all accessible monetary accounts of the user. You can add the parameter type to filter the response. When type={SCHEDULE_DEFINITION_PAYMENT,SCHEDULE_DEFINITION_PAYMENT_BATCH} is provided only schedule definition object that relate to these definitions are returned.
-
schedule.listAllScheduleForUserMonetaryAccountGet a collection of scheduled definition for a given monetary account. You can add the parameter type to filter the response. When type={SCHEDULE_DEFINITION_PAYMENT,SCHEDULE_DEFINITION_PAYMENT_BATCH} is provided only schedule definition object that relate to these definitions are returned.
-
schedule.readScheduleForUserMonetaryAccountGet a specific schedule definition for a given monetary account.
-
scheduleInstance.listAllScheduleInstanceForUserMonetaryAccountScheduleview for reading, updating and listing the scheduled instance.
-
scheduleInstance.readScheduleInstanceForUserMonetaryAccountScheduleview for reading, updating and listing the scheduled instance.
-
scheduleInstance.updateScheduleInstanceForUserMonetaryAccountScheduleview for reading, updating and listing the scheduled instance.
-
schedulePayment.createSchedulePaymentForUserMonetaryAccountEndpoint for schedule payments.
-
schedulePayment.deleteSchedulePaymentForUserMonetaryAccountEndpoint for schedule payments.
-
schedulePayment.listAllSchedulePaymentForUserMonetaryAccountEndpoint for schedule payments.
-
schedulePayment.readSchedulePaymentForUserMonetaryAccountEndpoint for schedule payments.
-
schedulePayment.updateSchedulePaymentForUserMonetaryAccountEndpoint for schedule payments.
-
schedulePaymentBatch.createSchedulePaymentBatchForUserMonetaryAccountEndpoint for schedule payment batches.
-
schedulePaymentBatch.deleteSchedulePaymentBatchForUserMonetaryAccountEndpoint for schedule payment batches.
-
schedulePaymentBatch.readSchedulePaymentBatchForUserMonetaryAccountEndpoint for schedule payment batches.
-
schedulePaymentBatch.updateSchedulePaymentBatchForUserMonetaryAccountEndpoint for schedule payment batches.
-
serverError.createServerErrorAn endpoint that will always throw an error.
-
serverPublicKey.listAllServerPublicKeyForInstallationShow the ServerPublicKey for this Installation.
-
session.deleteSessionDeletes the current session.
-
sessionServer.createSessionServerCreate a new session for a DeviceServer. Provide the Installation token in the "X-Bunq-Client-Authentication" header. And don't forget to create the "X-Bunq-Client-Signature" header. The response contains a Session token that should be used for as the "X-Bunq-Client-Authentication" header for all future API calls. The ip address making this call needs to match the ip address bound to your API key.
-
shareInviteMonetaryAccountInquiry.createShareInviteMonetaryAccountInquiryForUserMonetaryAccount[DEPRECATED - use /share-invite-monetary-account-response] Create a new share inquiry for a monetary account, specifying the permission the other bunq user will have on it.
-
shareInviteMonetaryAccountInquiry.listAllShareInviteMonetaryAccountInquiryForUserMonetaryAccount[DEPRECATED - use /share-invite-monetary-account-response] Get a list with all the share inquiries for a monetary account, only if the requesting user has permission to change the details of the various ones.
-
shareInviteMonetaryAccountInquiry.readShareInviteMonetaryAccountInquiryForUserMonetaryAccount[DEPRECATED - use /share-invite-monetary-account-response] Get the details of a specific share inquiry.
-
shareInviteMonetaryAccountInquiry.updateShareInviteMonetaryAccountInquiryForUserMonetaryAccount[DEPRECATED - use /share-invite-monetary-account-response] Update the details of a share. This includes updating status (revoking or cancelling it), granted permission and validity period of this share.
-
shareInviteMonetaryAccountResponse.listAllShareInviteMonetaryAccountResponseForUserReturn all the shares a user was invited to.
-
shareInviteMonetaryAccountResponse.readShareInviteMonetaryAccountResponseForUserReturn the details of a specific share a user was invited to.
-
shareInviteMonetaryAccountResponse.updateShareInviteMonetaryAccountResponseForUserAccept or reject a share a user was invited to.
-
sofortMerchantTransaction.listAllSofortMerchantTransactionForUserMonetaryAccountView for requesting Sofort transactions and polling their status.
-
sofortMerchantTransaction.readSofortMerchantTransactionForUserMonetaryAccountView for requesting Sofort transactions and polling their status.
-
statement.createStatementForUserMonetaryAccountEventUsed to create a statement export of a single payment.
-
statement.readStatementForUserMonetaryAccountEventUsed to create a statement export of a single payment.
-
switchServicePayment.readSwitchServicePaymentForUserMonetaryAccountAn incoming payment made towards an account of an external bank and redirected to a bunq account via switch service.
-
tokenQrRequestIdeal.createTokenQrRequestIdealForUserCreate a request from an ideal transaction.
-
tokenQrRequestSofort.createTokenQrRequestSofortForUserCreate a request from an SOFORT transaction.
-
transferwiseCurrency.listAllTransferwiseCurrencyForUserUsed to get a list of supported currencies for Transferwise.
-
transferwiseQuote.createTransferwiseQuoteForUserUsed to get quotes from Transferwise. These can be used to initiate payments.
-
transferwiseQuote.readTransferwiseQuoteForUserUsed to get quotes from Transferwise. These can be used to initiate payments.
-
transferwiseQuoteTemporary.createTransferwiseQuoteTemporaryForUserUsed to get temporary quotes from Transferwise. These cannot be used to initiate payments
-
transferwiseQuoteTemporary.readTransferwiseQuoteTemporaryForUserUsed to get temporary quotes from Transferwise. These cannot be used to initiate payments
-
transferwiseRecipient.createTransferwiseRecipientForUserTransferwiseQuoteUsed to manage recipient accounts with Transferwise.
-
transferwiseRecipient.deleteTransferwiseRecipientForUserTransferwiseQuoteUsed to manage recipient accounts with Transferwise.
-
transferwiseRecipient.listAllTransferwiseRecipientForUserTransferwiseQuoteUsed to manage recipient accounts with Transferwise.
-
transferwiseRecipient.readTransferwiseRecipientForUserTransferwiseQuoteUsed to manage recipient accounts with Transferwise.
-
transferwiseRecipientRequirement.createTransferwiseRecipientRequirementForUserTransferwiseQuoteUsed to determine the recipient account requirements for Transferwise transfers.
-
transferwiseRecipientRequirement.listAllTransferwiseRecipientRequirementForUserTransferwiseQuoteUsed to determine the recipient account requirements for Transferwise transfers.
-
transferwiseTransfer.createTransferwiseTransferForUserTransferwiseQuoteUsed to create Transferwise payments.
-
transferwiseTransfer.listAllTransferwiseTransferForUserTransferwiseQuoteUsed to create Transferwise payments.
-
transferwiseTransfer.readTransferwiseTransferForUserTransferwiseQuoteUsed to create Transferwise payments.
-
transferwiseTransferRequirement.createTransferwiseTransferRequirementForUserTransferwiseQuoteUsed to determine the account requirements for Transferwise transfers.
-
transferwiseUser.createTransferwiseUserForUserUsed to manage Transferwise users.
-
transferwiseUser.listAllTransferwiseUserForUserUsed to manage Transferwise users.
-
translinkTransaction.createTranslinkTransactionForUserMonetaryAccountUsed to create translink transactions.
-
translinkTransaction.listAllTranslinkTransactionForUserMonetaryAccountUsed to create translink transactions.
-
translinkTransaction.readTranslinkTransactionForUserMonetaryAccountUsed to create translink transactions.
-
treeProgress.listAllTreeProgressForUserSee how many trees this user has planted.
-
user.listAllUserGet a collection of all available users.
-
user.readUserGet a specific user.
-
userCompany.readUserCompanyGet a specific company.
-
userCompany.updateUserCompanyModify a specific company's data.
-
userPaymentServiceProvider.readUserPaymentServiceProviderUsed to view UserPaymentServiceProvider for session creation.
-
userPerson.readUserPersonGet a specific person.
-
userPerson.updateUserPersonModify a specific person object's data.
-
whitelistSdd.listAllWhitelistSddForUserGet a listing of all recurring SDD whitelist entries for a target monetary account.
-
whitelistSdd.listAllWhitelistSddForUserMonetaryAccountGet a listing of all SDD whitelist entries for a target monetary account.
-
whitelistSdd.readWhitelistSddForUserGet a specific recurring SDD whitelist entry.
-
whitelistSdd.readWhitelistSddForUserMonetaryAccountGet a specific SDD whitelist entry.
-
whitelistSddOneOff.createWhitelistSddOneOffForUserCreate a new one off SDD whitelist entry.
-
whitelistSddOneOff.deleteWhitelistSddOneOffForUserWhitelist an one off SDD so that when another one off SDD from the creditor comes in, it is automatically accepted.
-
whitelistSddOneOff.listAllWhitelistSddOneOffForUserGet a listing of all one off SDD whitelist entries for a target monetary account.
-
whitelistSddOneOff.readWhitelistSddOneOffForUserGet a specific one off SDD whitelist entry.
-
whitelistSddOneOff.updateWhitelistSddOneOffForUserWhitelist an one off SDD so that when another one off SDD from the creditor comes in, it is automatically accepted.
-
whitelistSddRecurring.createWhitelistSddRecurringForUserCreate a new recurring SDD whitelist entry.
-
whitelistSddRecurring.deleteWhitelistSddRecurringForUserWhitelist a recurring SDD so that when another recurrence comes in, it is automatically accepted.
-
whitelistSddRecurring.listAllWhitelistSddRecurringForUserGet a listing of all recurring SDD whitelist entries for a target monetary account.
-
whitelistSddRecurring.readWhitelistSddRecurringForUserGet a specific recurring SDD whitelist entry.
-
whitelistSddRecurring.updateWhitelistSddRecurringForUserWhitelist a recurring SDD so that when another recurrence comes in, it is automatically accepted.
-
openapi.previewSpecPreview an OpenAPI document before adding it as a source
-
openapi.addSourceAdd an OpenAPI source and register its operations as tools